Indulgence in Every Bite: Decadent Brownie Truffles
Welcome to SavoryAddict, where I transform everyday moments into unforgettable culinary experiences! Today, we’re diving into a treat that will make your sweet tooth sing—Brownie Truffles. Yes, you heard that right! These little bites of joy are a magical fusion of creamy goodness and chocolatey bliss, and I can’t wait to share them with you.
Imagine sinking your teeth into a dense, fudgy brownie that melts in your mouth, coated in a smooth chocolate shell, or perhaps adorned with sprinkles or crushed nuts. Can you feel the excitement? These brownie truffles not only satisfy your dessert cravings but also come together surprisingly easily. Whether you’re hosting a gathering, treating yourself, or simply want to impress your friends, these truffles are the perfect treat. Plus, they’re incredibly versatile—so let’s conquer that kitchen together!
A Trip Down Memory Lane
Before we dive into the recipe, I have to share a little story. I remember the first time I made brownie truffles. It was during a cozy winter weekend when my friends and I decided to have an epic movie marathon. We were armed with bowls of popcorn, cozy blankets, and, of course, something sweet to indulge in. I had a box of brownie mix sitting on my kitchen counter that was begging to be used.
While baking them, I had the idea to turn our favorite dessert into bite-sized delights! The moment I rolled the brownies into truffle shapes, I drizzled some melted chocolate on top and sprinkled crushed nuts, thinking, “This is going to be a game changer.” That night, as my friends tasted the first truffles, the room filled with “Mmm” and “Oh wow!”—pure bliss! The experience wasn’t just about the dessert; it was about sharing joy and laughter, a moment etched in my heart. Ever since, Brownie Truffles have held a special place on my dessert table and, clearly, in my recipes at SavoryAddict.
Ingredients
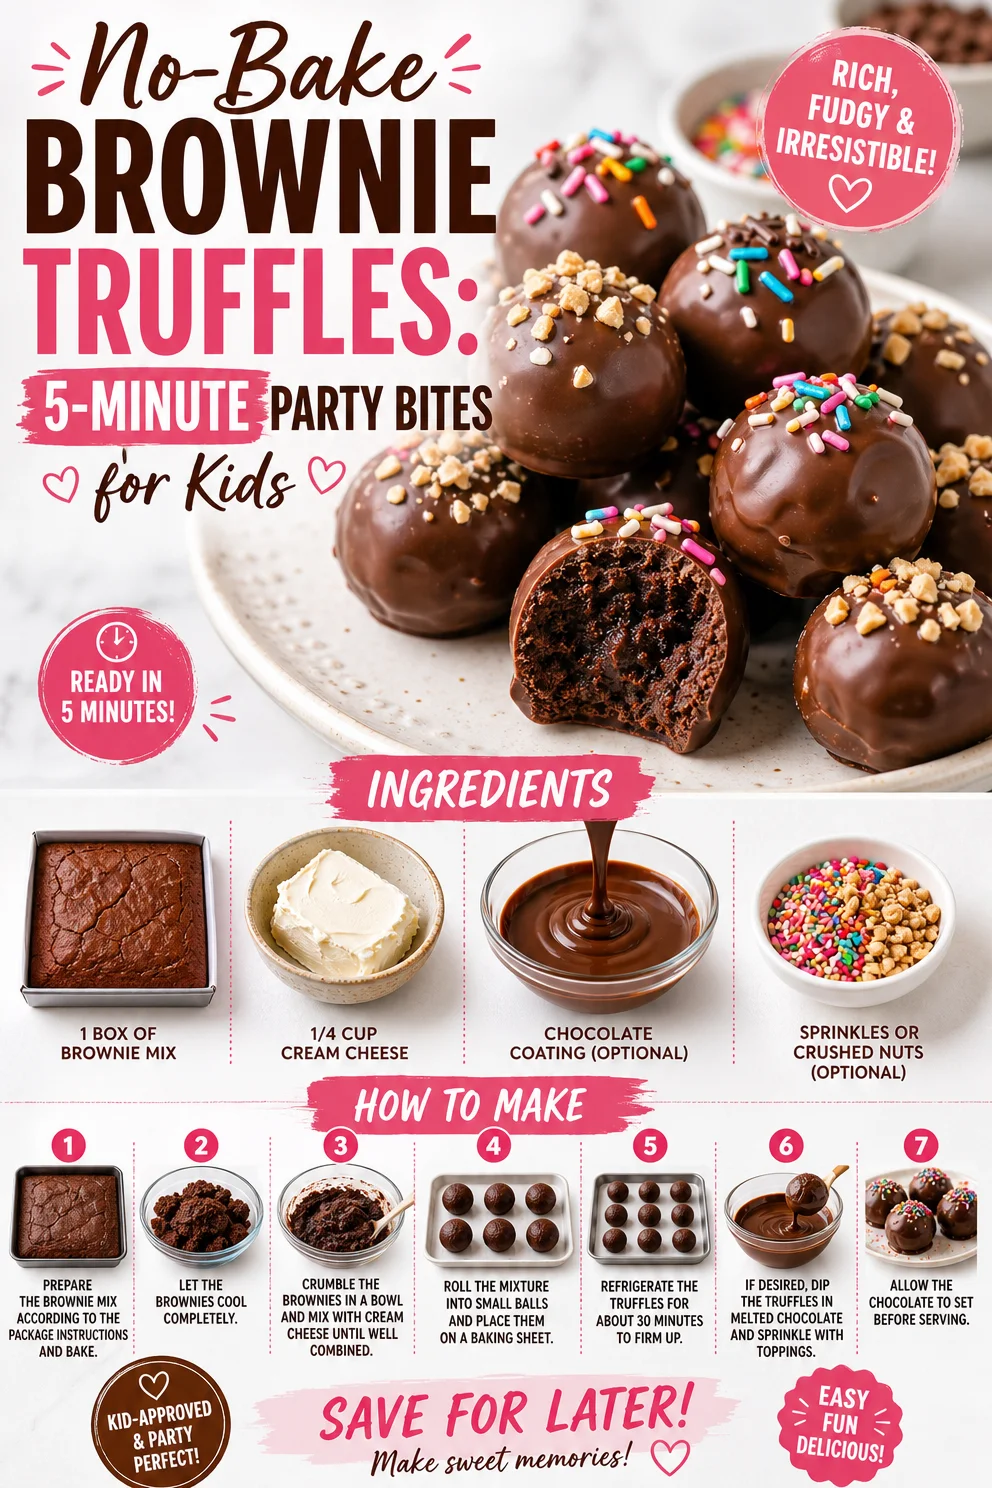
Let’s get to the ingredients you’ll need to create these delightful Brownie Truffles. Here’s a quick rundown:
-
1 box of brownie mix: The star of the show! A classic brownie mix makes this recipe super easy. If you want a homemade version, you can mix up your favorite brownie recipe instead.
-
1/4 cup cream cheese: This adds a rich, creamy texture to the truffles, making them wonderfully luscious. For a dairy-free alternative, try using cashew cream or coconut cream.
-
Chocolate coating (optional): While dipping the truffles in chocolate is optional, it definitely takes them to the next level! You can use milk chocolate, dark chocolate, or white chocolate—each offering a delicious twist.
-
Sprinkles or crushed nuts (optional): These are perfect for topping your truffles and adding that playful touch! Use rainbow sprinkles for a fun look, or crushed nuts for a delightful crunch. Nut-free? Go for colorful edible glitter instead!
Step-by-Step Instructions
Let’s get crafting these Brownie Truffles! Grab your apron, roll up those sleeves, and let’s make some magic happen.
-
Prepare the Brownies: Follow the instructions on your brownie mix box. Combine the mix with the ingredients called for on the box (usually eggs, oil, and water). Then bake according to the package instructions and let them cool completely. Tip: The brownies need to be cool for easier handling, plus it helps prevent melty fingers while rolling!
-
Mix in the Cream Cheese: Once cooled, crumble the brownies into a large bowl. Add the cream cheese and mix it all together with a spatula or your hands until fully combined and smooth. Chef hack: For an easier mix, let your cream cheese sit out at room temperature for about 15 minutes before using it. This way, it blends seamlessly with the brownies!
-
Form the Truffles: With clean hands, take small portions of the brownie mixture and roll them into balls about 1 inch in size. Place them on a baking sheet lined with parchment paper as you go. Note: You can use a cookie scoop for evenly sized truffles—makes the process quicker!
-
Chill the Truffles: Once all the brownie balls are shaped, pop them in the fridge for about 30 minutes. Tip: Chilling solidifies the truffles, which helps them hold their shape when you dip them in chocolate.
-
Coat the Truffles (Optional): If you want to coat them in chocolate, melt your chocolate coating in a microwave-safe bowl in 30-second intervals, stirring in between until smooth. Dip each truffle into the melted chocolate, allowing any excess to drip off, then place them back onto the parchment paper. Chef hack: For an extra decorative touch, sprinkle crushed nuts or sprinkles on top right after dipping while the chocolate is still wet!
-
Final Chill: Return the dipped truffles to the fridge for another 30 minutes to let the coating set.
-
Serve and Enjoy: Now, time to indulge! Serve your Brownie Truffles on a beautiful plate, or better yet, in a decorative box tied with a ribbon for a lovely gift!
Serving Suggestions
When it comes to serving Brownie Truffles, presentation is key! Place them in a lovely dessert dish or stack them in a clear jar with a ribbon tied around it for that homemade gift feel. Scatter some edible flowers or seasonal fruits around the truffles for an elegant touch. They are perfect for any celebration—birthdays, holidays, or even just because!
Recipe Variations
Feeling adventurous? Here are a few fun twists on the classic Brownie Truffles:
-
Mint Chocolate Delight: Add a few drops of peppermint extract to the brownie mixture for that cool mint flavor.
-
Peanut Butter Bliss: Mix in some creamy peanut butter with the cream cheese for a nutty vibe.
-
Coconut Dream: Roll truffles in shredded coconut after coating them in chocolate for a tropical twist.
-
Spicy Kick: Add a pinch of cayenne or chili powder to the chocolate coating for a surprising hint of heat.
-
Veggie Option: Substitute black beans for the brownie mix to create a healthier, high-fiber truffle!
Chef’s Notes
I can’t even begin to tell you how many variations of these Brownie Truffles have popped up since that winter’s night with my friends. They’ve evolved from a simple weekend project into a staple at my dinner parties. I once tried a raspberry-infused chocolate coating, and let me tell you—it was a game changer! Kitchen experiments like these keep cooking fun and exciting. Plus, I love how these truffles can adapt to the seasons, with flavors that celebrate holidays, birthdays, or just a random Wednesday.
FAQs and Troubleshooting
1. My truffles are falling apart! What did I do wrong?
No worries! This can happen if the brownies were too crumbly or didn’t have enough moisture. Adding a tad more cream cheese can help bind them. Make sure your brownies are fully cooled and crumbled evenly, as both factors are key.
2. Can I make these truffles ahead of time?
Absolutely! Brownie Truffles taste fantastic when made a day or two in advance. Store them in an airtight container in the fridge, and they’ll be ready to go whenever you need a sweet treat.
3. How do I store leftover truffles?
Keep your truffles in an airtight container in the fridge. They should last about a week (if they last that long!). But be warned, they might just disappear too quickly!
4. What if I don’t like or can’t eat chocolate?
No need to miss out! You can use vanilla coating (candy melts) instead of chocolate. You can even roll in cocoa powder or crushed graham crackers for a fun twist!
Nutritional Info
While I’m all about enjoying these delightful truffles, it’s good to know what you’re munching on! Each truffle (assuming you make about 20 from the recipe) is roughly 90 calories, depending on the chocolate coating, with some protein and fat from the cream cheese.
And there you have it—Delicious Brownie Truffles that are simple, fun, and wholly satisfying! I hope this inspires you to grab a box of brownie mix and whip up these delightful bites. Remember, cooking is about joy and creativity, so let your imagination run wild! Happy truffle-making, and welcome to the SavoryAddict crew!
PrintDecadent Brownie Truffles

These Brownie Truffles are a magical fusion of creamy goodness and chocolatey bliss, perfect for any occasion.
- Prep Time: 15 minutes
- Cook Time: 30 minutes
- Total Time: 45 minutes
- Yield: 20 truffles 1x
- Category: Dessert
- Method: Chilling and Coating
- Cuisine: American
- Diet: Vegetarian
Ingredients
- 1 box of brownie mix
- 1/4 cup cream cheese
- Chocolate coating (optional)
- Sprinkles or crushed nuts (optional)
Instructions
- Prepare the Brownies: Follow the instructions on your brownie mix box. Combine the mix with the ingredients called for on the box and bake according to package instructions. Let cool completely.
- Mix in the Cream Cheese: Crumble the cooled brownies into a large bowl, add cream cheese, and mix until smooth.
- Form the Truffles: Roll small portions of the brownie mixture into 1-inch balls and place on a baking sheet lined with parchment paper.
- Chill the Truffles: Refrigerate the truffles for 30 minutes to help them hold their shape.
- Coat the Truffles: Melt chocolate coating and dip truffles, allowing excess to drip off, then return them to the parchment.
- Final Chill: Chill the coated truffles for another 30 minutes.
- Serve and Enjoy: Present your truffles on a decorative plate or box for gifting.
Notes
Truffles can be made ahead of time and stored in an airtight container in the fridge. You can also experiment with different flavors and coatings.
Nutrition
- Serving Size: 1 truffle
- Calories: 90
- Sugar: 8g
- Sodium: 90mg
- Fat: 5g
- Saturated Fat: 3g
- Unsaturated Fat: 1g
- Trans Fat: 0g
- Carbohydrates: 10g
- Fiber: 1g
- Protein: 1g
- Cholesterol: 10mg
Keywords: brownie truffles, chocolate dessert, easy dessert recipe, sweet treats, homemade gifts