Classic Crème Brûlée: A Love Letter to Dessert
Oh, the sweet, creamy perfection that is crème brûlée! The moment you crack that glassy, caramelized sugar crust and let the velvety custard slide onto your spoon is nothing short of magical. Let’s be real: this elegant dessert often feels like a guilty indulgence you only get to enjoy in fancy restaurants. But guess what? You can whip this dreamy delight up in your very own kitchen, and I’m here to show you how!
Welcome to my delightful kitchen where each recipe tells a story, and the main character today is none other than crème brûlée. It’s not just a dessert; it’s a celebration of simplicity and sophistication combined. I first fell in love with this dish as a college student. Picture this: I was hosting a dinner party for my friends, attempting to impress them with my culinary skills. Thankfully, I stumbled upon a recipe for crème brûlée that claimed to be easy enough for a novice like me. Little did I know, this silky custard topped with a crunchy layer of caramelized sugar would become my go-to dessert for entertaining.
That night, as my friends delighted in the rich flavors and the satisfying crack of the sugar topping, I realized that cooking is about creating memorable experiences—not just the food itself. And sharing those moments in the kitchen is what the SavoryAddict spirit is all about! So grab your whisk and let’s dive into making this classic crème brûlée, because dessert should never be a once-in-a-while treat!
A Kitchen Memory: Finding My Dessert Groove
Let’s rewind to that fateful dinner party I mentioned—as the stress of hosting started to fill the room, I was desperate to find a crowd-pleasing finale. Most of my friends were self-proclaimed dessert connoisseurs, and I was determined to make something that would blow their minds (or at least take the focus off my not-so-perfect roast chicken). After some quick browsing, I found crème brûlée, and the rest is history!
With every step of the recipe, I channeled my inner chef while simultaneously navigating my rickety old oven and a very impatient group of friends who were all too eager to dig in. The best part? I replaced the intimidating blowtorch with my kitchen broiler, making caramelizing the sugar feel like a fun science experiment rather than a culinary feat. You should have seen their faces as I served those adorable little ramekins covered in golden sugar—pure bliss! This dessert touched hearts (and taste buds), and it always reminds me that cooking is about adventure, even when things get a little messy.
Ingredients You’ll Need
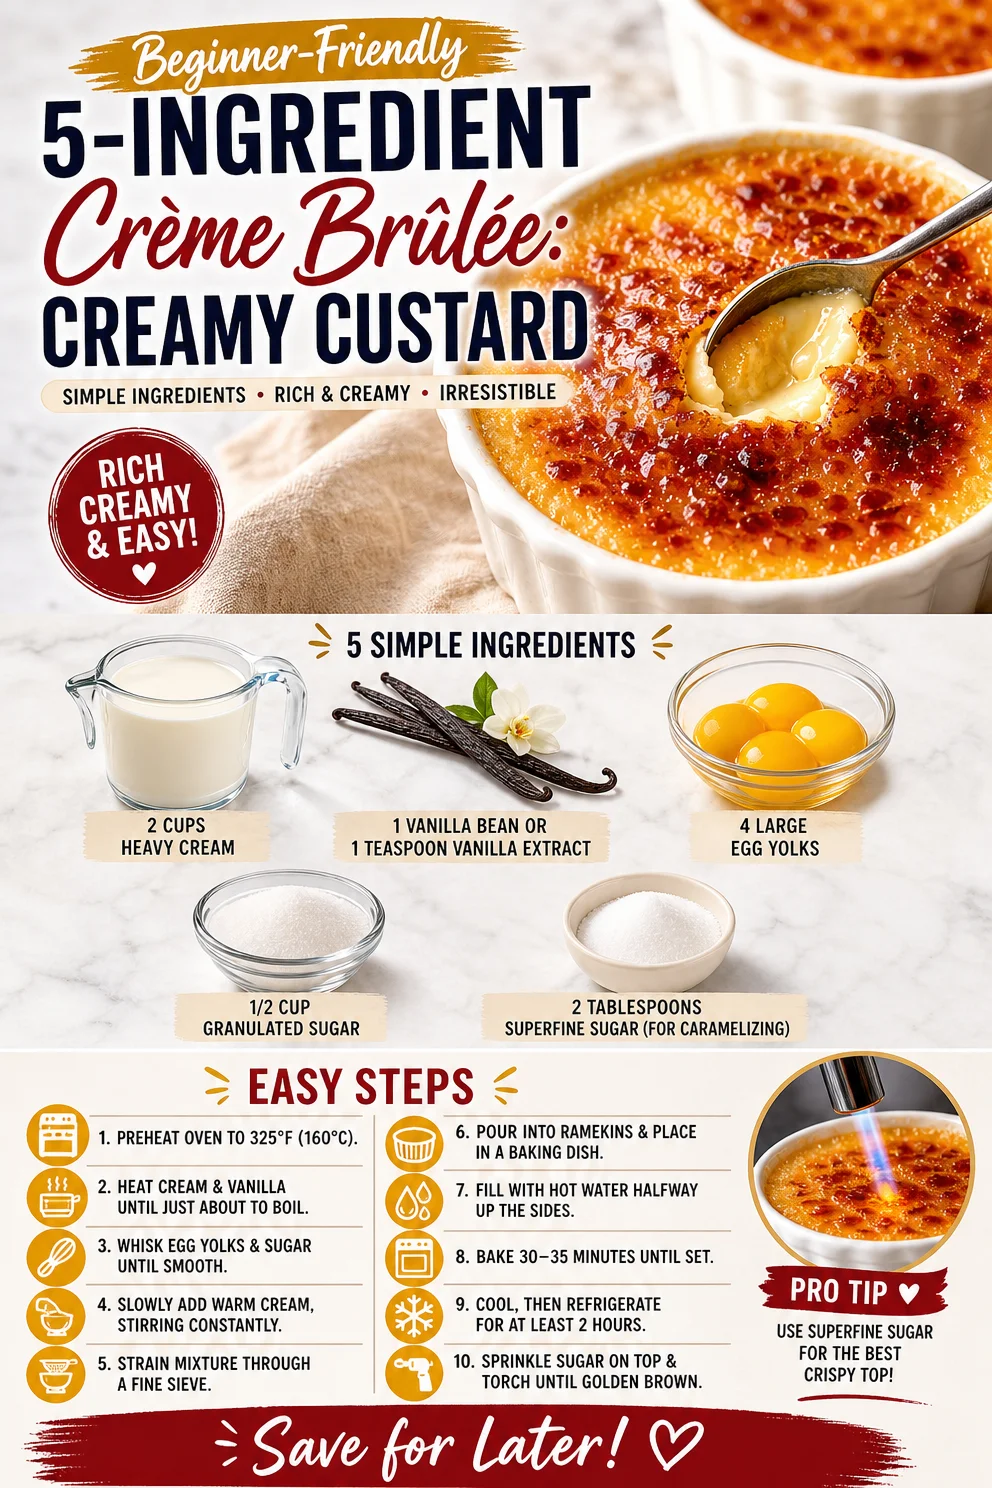
Here’s a quick rundown of the ingredients you’ll need for your homemade crème brûlée. Each component plays a crucial role in delivering that creamy, dreamy texture and unforgettable flavor:
-
2 cups heavy cream
Heavy cream is the star of the show, giving the dessert its rich and velvety texture. For a lighter option, you could use half-and-half, though it won’t be as creamy. -
1 vanilla bean or 1 teaspoon vanilla extract
Using a fresh vanilla bean will elevate your crème brûlée with its delightful aroma and flavor. If you can’t find one, high-quality vanilla extract works too! -
4 large egg yolks
Egg yolks are crucial for that luscious custard texture. These little beauties thicken the cream as it cooks, creating a decadently smooth base. -
1/2 cup granulated sugar
This sugar sweetens the custard and balances the richness of the cream. If you prefer less sweetness, you could reduce it to 1/3 cup. -
2 tablespoons superfine sugar (for caramelizing)
Superfine sugar will melt seamlessly on top of your crème brûlée when caramelized, creating a crispy crust. You can also make your own by blending granulated sugar briefly in a food processor.
Step-by-Step Guide: Making Crème Brûlée
Let’s roll up those sleeves and get cracking! Here’s how you can make this heavenly dessert at home.
Step 1: Preheat the Oven
Preheat your oven to 325°F (160°C). This ensures that the custard cooks evenly and sets beautifully.
Step 2: Mix your Cream and Vanilla
In a heavy saucepan over medium heat, pour in the heavy cream. If you’re using a vanilla bean, slice it open, scrape out those fragrant seeds, and add both the seeds and the pod into the cream. If you’re using vanilla extract, save it for later. Heat until just boiling, then remove from heat—this is where the magic begins.
Step 3: Whisk those Yolks
In a mixing bowl, whisk together the egg yolks and granulated sugar until the mixture turns a lovely pale yellow and falls smoothly from the whisk. This step is essential to ensure that your custard is perfectly creamy, so whisk away until combined.
Step 4: Tempering Time
Now it’s critical to temper your eggs. Gradually add a few tablespoons of the hot cream mixture to your yolk-sugar blend while whisking continuously. This prevents the egg yolks from scrambling. Once it’s combined, slowly pour the remaining cream mixture into the bowl, whisking away!
Step 5: Strain and Prepare to Bake
To catch any rogue bits of egg, strain the mixture through a fine-mesh sieve into a large measuring cup or bowl. This ensures a silky-smooth custard. Now, place your ramekins in a baking dish and fill each with the custard mixture up to about ¾ full.
Step 6: Water Bath Magic
Fill the baking dish with hot water until it comes halfway up the sides of the ramekins. This water bath helps maintain a gentle, even cooking temperature, which is vital for crème brûlée success.
Step 7: Bake Away!
Place the whole setup in your preheated oven and bake for 30-40 minutes—or until the edges are set but the center still has a slight jiggle. Your kitchen will smell absolutely divine!
Step 8: Chill Out
Once baked, remove the ramekins from the water bath (carefully, please!) and let them cool for about 15 minutes. Then pop them in the fridge to chill for at least two hours, or overnight if you can resist.
Step 9: Caramelize!
When you’re ready to serve, sprinkle a thin layer of superfine sugar on top of each custard. Using a kitchen torch, carefully caramelize the sugar until it’s golden and crispy. If you don’t have a torch, you can place them under a broiler for a minute or two, but keep a close eye!
Step 10: Serve and Enjoy
Let the sugar crust cool for a minute, then it’s time to dig in! Use your spoon to crack the beautiful sugar topping and dive into the creamy custard beneath.
Serving Suggestions
For a polished presentation, serve the crème brûlée directly in the ramekins it was baked in. Garnish with a fresh sprig of mint or a few berries for a pop of color and extra flavor. A cup of freshly brewed coffee or a glass of dessert wine pairs beautifully with the rich custard, rounding out the experience nicely!
Recipe Variations
-
Chocolate Crème Brûlée: Swap a quarter cup of cream for melted chocolate for a rich and indulgent twist.
-
Coffee Crème Brûlée: Infuse your cream with strong brewed coffee or espresso for a bold flavor kick.
-
Citrus Infusion: Add the zest of an orange or lemon to the cream for a refreshing citrus note.
-
Nutty Delight: Incorporate some finely chopped hazelnuts or pistachios into the base for a nutty crunch.
-
Herbal Touch: Infuse the cream with fresh herbs like lavender or thyme to give a unique twist to the classic flavor.
Chef’s Notes
Making crème brûlée has become a cherished custom not only for special occasions but also during cozy nights in. Over the years, I’ve experimented with various flavors and techniques. I remember serving my first batch to my grandmother, who loved sweets more than anyone I knew. I was nervous, but the look on her face when she took that first bite made every kitchen bombing feel worth it.
And here’s a tip: the key to perfecting your crème brûlée is patience. Allow it to cool properly and set fully in the fridge. Even though it’s tempting to dive in right after the sugar has been caramelized, the flavors develop and deepen as it chills.
FAQs and Troubleshooting
1. Why is my custard not setting?
If your custard is still jiggly in the center after the baking time, it probably needs a bit more time in the oven. Every oven is a little different, so check at 5-minute intervals.
2. How do I avoid a grainy texture?
Make sure to strain your custard mixture before baking. The fine-mesh sieve will catch any bits of cooked egg and ensure a silky custard.
3. Can I make this ahead of time?
Absolutely! Crème brûlée can be made a day in advance. Just store it in the fridge, covered with plastic wrap, until you’re ready to caramelize the sugar.
4. What if I don’t have a torch?
No worries! You can use the broiler method as mentioned earlier. Just watch closely so you don’t end up with burnt sugar (nobody wants that!).
Nutritional Info
While crème brûlée is definitely a decadent treat and should be enjoyed in moderation, here’s a quick nutritional breakdown for one serving (based on classic preparation):
- Calories: 320-350
- Total Fat: 24g
- Saturated Fat: 14g
- Cholesterol: 180mg
- Carbohydrates: 25g
- Sugars: 20g
- Protein: 5g
Remember, this is a delightful indulgence, so savor every bite!
And there you have it! With each layer of rich flavor and that satisfyingly crunchy topping, this crème brûlée is sure to impress friends, family, or even just yourself on a cozy night in. So go forth and bake! You’ve got this, and I can’t wait to hear how your culinary adventure goes. Happy cooking, SavoryAddicts!
PrintClassic Crème Brûlée
A decadent and creamy dessert featuring a silky custard base topped with a crispy caramelized sugar crust.
- Prep Time: 15 minutes
- Cook Time: 40 minutes
- Total Time: 55 minutes
- Yield: 4 servings 1x
- Category: Dessert
- Method: Baking
- Cuisine: French
- Diet: Vegetarian
Ingredients
- 2 cups heavy cream
- 1 vanilla bean or 1 teaspoon vanilla extract
- 4 large egg yolks
- 1/2 cup granulated sugar
- 2 tablespoons superfine sugar (for caramelizing)
Instructions
- Preheat your oven to 325°F (160°C).
- Mix the heavy cream and vanilla in a saucepan over medium heat.
- Whisk together the egg yolks and granulated sugar until pale yellow.
- Temper your eggs by gradually adding cream to the yolk mixture while whisking.
- Strain the mixture through a fine-mesh sieve into a measuring cup.
- Prepare a baking dish with water and fill each ramekin with the custard mixture.
- Bake for 30-40 minutes until set with a slight jiggle.
- Chill in the fridge for at least 2 hours.
- Caramelize the sugar using a kitchen torch or under the broiler.
- Serve and enjoy!
Notes
For variations, try chocolate, coffee, citrus, or add nuts for a unique twist.
Nutrition
- Serving Size: 1 serving
- Calories: 350
- Sugar: 20g
- Sodium: 50mg
- Fat: 24g
- Saturated Fat: 14g
- Unsaturated Fat: 8g
- Trans Fat: 0g
- Carbohydrates: 25g
- Fiber: 0g
- Protein: 5g
- Cholesterol: 180mg
Keywords: crème brûlée, dessert, French dessert, custard, caramelized sugar