
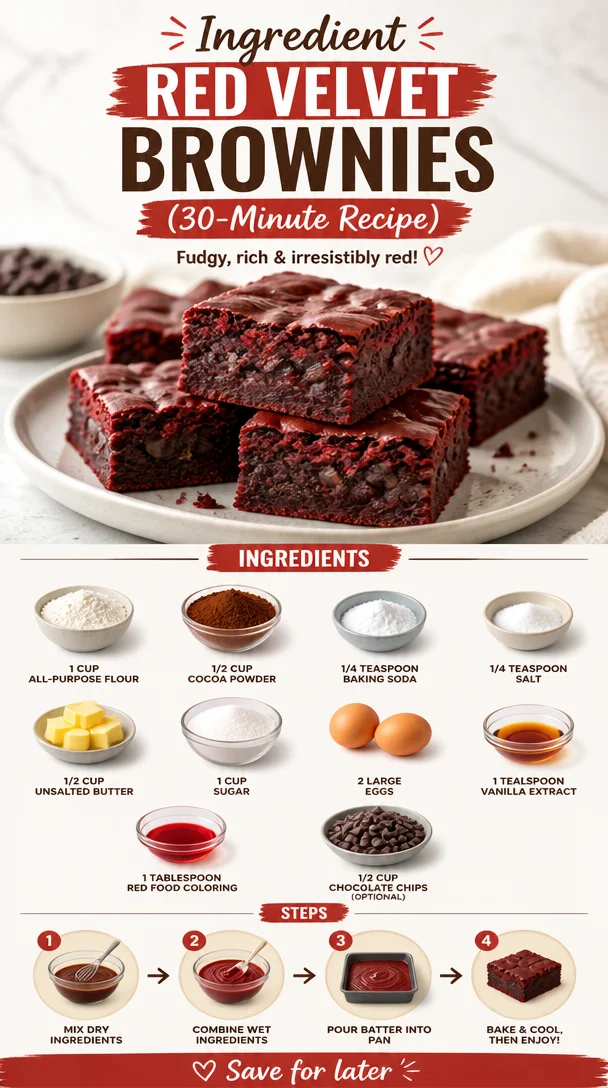
Indulge in Decadence: Red Velvet Brownies Recipe
Welcome back to SavoryAddict, where we transform everyday meals into unforgettable culinary experiences! Today, I’m thrilled to share a recipe that will have your taste buds dancing: Red Velvet Brownies. These fudgy delights are the perfect blend of rich cocoa, luscious vanilla, and a pop of gorgeous color that makes them not only mouthwatering but also visually stunning.
Picture this—you’re hosting a cozy get-together, friends are laughing, and the aroma of freshly baked brownies fills the air. As you serve up these red velvet treasures, everyone’s eyes widen with delight. Each bite is a perfect mix of chewy brownie goodness and that signature red velvet flavor. Whether you’re celebrating a holiday, a birthday, or simply a Wednesday, these brownies will make any occasion feel special.
A Kitchen Memory: Falling in Love with Red Velvet
My love for red velvet dates back to my childhood, thanks to my grandma. Whenever I visited her, her kitchen was a magical place where the smell of baked goods wafted through the air. One day, she decided to play around with her classic brownie recipe—because who doesn’t love a little fun in the kitchen? She added a splash of red food coloring and whipped up a batch of what she called “Red Velvet Brownies.”
Watching her mix the batter, I was mesmerized by the vibrant hue and the way the chocolate combined with the hints of vanilla. When those brownies came out of the oven, warm and gooey, I learned that these treats not only looked stunning but tasted incredible too. They were a hit at our family gatherings, and that’s where my obsession began. So, grab your apron, and let’s recreate this cherished memory together.
Ingredients You’ll Need
To make these irresistible Red Velvet Brownies, let’s gather the essentials:
- 1 cup all-purpose flour: This is the base that gives our brownies structure. If you need a gluten-free option, try substituting this with almond flour or a gluten-free flour blend.
- 1/2 cup cocoa powder: Use high-quality unsweetened cocoa for the rich chocolate flavor. Don’t have cocoa? You can use carob powder, but it will change the flavor profile slightly.
- 1/4 teaspoon baking soda: This little ingredient gives the brownies a bit of lift, creating a delightful texture. If you don’t have baking soda, you could use baking powder, but adjust the quantity – about 1 teaspoon should work in this case.
- 1/4 teaspoon salt: A pinch of salt enhances the flavors. If you’re watching your sodium intake, feel free to omit or reduce it.
- 1/2 cup unsalted butter: Butter contributes to the richness and moist texture. If you’re in a pinch, you can use coconut oil for a dairy-free option.
- 1 cup sugar: Sugar sweetens and helps with that chewy texture. For a healthier alternative, consider coconut sugar, but be aware that it will alter the final color and flavor slightly.
- 2 large eggs: Eggs bind the ingredients together for that perfect brownie consistency. If you need an egg substitute, try using 1/4 cup unsweetened applesauce or a flax egg (1 tablespoon ground flaxseed mixed with 2.5 tablespoons water).
- 1 teaspoon vanilla extract: This is where the magic happens! Vanilla adds depth and warmth; high-quality extract makes a difference.
- 1 tablespoon red food coloring: The star ingredient that gives these brownies their iconic red hue. You can opt for natural alternatives like beet juice, but the color won’t be as vibrant.
- 1/2 cup chocolate chips (optional): Chocolate chips add an extra layer of gooeyness. You can replace these with white chocolate chips for a fun twist!
Step-by-Step Instructions
Ready to dive into the baking? Let’s get started! Here’s how to create these decadent Red Velvet Brownies step-by-step:
-
Preheat Your Oven: First things first, preheat your oven to 350°F (175°C). This ensures that your brownies bake evenly. I like to line my baking pan with parchment paper for easy removal and cleanup.
-
Mix the Dry Ingredients: In a medium bowl, whisk together the flour, cocoa powder, baking soda, and salt. This is an important step—not just to combine but to aerate the flour so your brownies are light and fluffy.
-
Cream the Butter and Sugar: In a separate large bowl, melt your unsalted butter (you can do this in the microwave or on the stovetop). Whisk in the sugar until it’s well combined and smooth. This step is crucial; it helps to dissolve the sugar, allowing your brownies to be perfectly moist.
-
Add Eggs and Vanilla: Add the eggs one at a time, mixing well after each addition. This is where your brownies start to come together! Finally, stir in the vanilla extract. Your kitchen will smell divine at this point!
-
Incorporate the Food Coloring: Time to bring in the show-stopping color! Stir in the red food coloring until evenly distributed. It should be vibrant and eye-catching, be careful not to spill—it stains!
-
Combine Dry and Wet Ingredients: Gently fold the dry ingredients into the wet mixture until just combined. Overmixing can lead to tough brownies, and we want them to remain tender and fudgy.
-
Add Chocolate Chips: If you’re going for the ooey-gooey chocolate experience, now’s the time to fold in your chocolate chips. This is also when you can customize with nuts if you fancy a bit of crunch!
-
Bake Away: Pour the batter into the prepared baking dish, using a spatula to spread it evenly. Bake in your preheated oven for about 20 to 25 minutes, or until a toothpick inserted in the center comes out with a few moist crumbs but not wet batter.
-
Cool and Slice: Let the brownies cool in the pan on a wire rack for about 10 minutes. Then, carefully lift them out using the parchment paper and let them cool completely before slicing. This way, they hold their shape better.
Serving Suggestions
To plate these eye-popping Red Velvet Brownies, consider dusting them with powdered sugar or a drizzle of cream cheese icing for a classic touch. Add a scoop of vanilla ice cream on the side for an indulgent treat. After all, the best desserts are always served with a little flair!
Recipe Variations
Feeling adventurous? Here are a few tasty twists to add to this classic recipe:
- Cream Cheese Swirl: Make a quick cream cheese mixture (8 oz cream cheese, 1/4 cup sugar, 1 egg) and swirl it into the brownie batter before baking for a delightful cheesecake flavor.
- Nutty Additions: Add in chopped pecans or walnuts for crunch and a nutty vibe.
- Mint Chocolate Chip: Substitute a few drops of peppermint extract for a refreshing flavor that pairs beautifully with chocolate.
- Spicy Twist: Add a pinch of cayenne pepper or cinnamon to the batter for an unexpected kick!
- Dairy-Free Option: Use coconut oil in place of butter and dairy-free chocolate chips for an entirely dairy-free brownie.
Chef’s Notes
These Red Velvet Brownies have been a staple in my house since that cherished day with my grandma. They’ve evolved over time, with my tweaks and crazy flavor experiments, but the heart of the recipe remains unchanged. It’s funny how each batch tells a story, connected to beautiful moments with friends and family. I still love whipping them up whenever I want to bring a little joy or impress guests at parties.
Remember, the kitchen is a playground! Experiment with flavors, adjust textures, and make them uniquely yours. Whatever journey these brownies take you on, enjoy every minute of it.
FAQs and Troubleshooting
-
My brownies didn’t rise; what went wrong?
If your brownies turned out flat, it could be due to expired baking soda or not enough mixing after adding the eggs. Ensure everything is fresh and well combined next time. -
Why are my brownies cakey instead of fudgy?
Overbaking is often the culprit. Keep an eye on the time and take them out as soon as the toothpick comes out with a few moist crumbs. -
I don’t have any food coloring—what do I do?
No worries! If you’re in a pinch, just up the cocoa a little and omit the food coloring for a perfectly delicious chocolate brownie—but it won’t have that iconic color. -
Can I freeze leftovers?
Absolutely! These brownies freeze really well. Just wrap them in foil or place them in an airtight container for up to 3 months. Thaw, and they’re ready to devour.
Nutritional Info (Optional)
For those mindful of their intake, here’s a rough estimate per brownie (based on 16 servings):
- Calories: 200
- Total Fat: 10g
- Saturated Fat: 5g
- Cholesterol: 40mg
- Sodium: 100mg
- Carbohydrates: 28g
- Fiber: 1g
- Sugar: 15g
- Protein: 2g
Now that your taste buds are tingling, it’s time to roll up your sleeves and dive into the kitchen! I can’t wait to see your version of these Red Velvet Brownies. Snap a picture, share the love, and let’s keep the savory moments rolling! Enjoy every delicious bite.
PrintRed Velvet Brownies
Indulge in these rich and fudgy Red Velvet Brownies, a delightful blend of cocoa and vibrant color, perfect for any occasion.
- Prep Time: 15 minutes
- Cook Time: 25 minutes
- Total Time: 40 minutes
- Yield: 16 servings 1x
- Category: Dessert
- Method: Baking
- Cuisine: American
- Diet: Vegetarian
Ingredients
- 1 cup all-purpose flour
- 1/2 cup cocoa powder
- 1/4 teaspoon baking soda
- 1/4 teaspoon salt
- 1/2 cup unsalted butter
- 1 cup sugar
- 2 large eggs
- 1 teaspoon vanilla extract
- 1 tablespoon red food coloring
- 1/2 cup chocolate chips (optional)
Instructions
- Preheat your oven to 350°F (175°C).
- Mix the flour, cocoa powder, baking soda, and salt in a bowl.
- Cream the melted butter and sugar until smooth.
- Add the eggs one at a time, then stir in the vanilla extract.
- Incorporate the red food coloring into the mix.
- Combine the dry ingredients with the wet ingredients until just mixed.
- Add the chocolate chips if desired.
- Bake for 20 to 25 minutes until a toothpick comes out with moist crumbs.
- Cool the brownies for 10 minutes before slicing.
Notes
For a cream cheese twist, swirl a mixture of cream cheese, sugar, and egg into the batter before baking.
Nutrition
- Serving Size: 1 brownie
- Calories: 200
- Sugar: 15g
- Sodium: 100mg
- Fat: 10g
- Saturated Fat: 5g
- Unsaturated Fat: 5g
- Trans Fat: 0g
- Carbohydrates: 28g
- Fiber: 1g
- Protein: 2g
- Cholesterol: 40mg
Keywords: red velvet, brownies, dessert, baking, easy recipe