Mini Cheesecakes: Tiny Treats That Pack a Big Punch!
Welcome to my kitchen, foodies! Today, we’re diving into the delightful world of mini cheesecakes. Trust me when I say these little bites of joy are going to steal your heart. Picture this: a smooth, creamy filling perched atop a crunchy graham cracker crust, just waiting to be adorned with your favorite toppings. Whether you’re hosting a get-together, gifting a sweet treat, or treating yourself (because you absolutely deserve it!), mini cheesecakes are here to impress.
What I love most about these mini cheesecakes is how simple and versatile they are. You don’t need to be a professional chef to whip these babies up, and let’s face it: everyone loves a dessert that looks stunning and tastes even better. They can mingle on a dessert table or stand tall as the star of any meal. And let’s not forget, they’re portion-controlled—because who doesn’t appreciate a guilt-free indulgence?
As we go through this recipe, you’ll find that it’s not just about cooking; it’s about creating moments. Each bite tells a story, whether it’s a gathering of friends, a family celebration, or just a cozy night on the couch with a good movie. So, grab your apron, and let’s get started on these irresistible mini cheesecakes!
A Slice of Nostalgia
Ah, mini cheesecakes bring back some of my happiest memories! I remember the first time I decided to make them—my friends and I had planned a cozy get-together, and I wanted to impress them with something special. As a young cook, I’d faced my fair share of kitchen disasters, but this time, it felt… different. Mixing the cream cheese with the sugar and watching it transform into a velvety batter was pure magic.
The air filled with sweet aromas in my tiny kitchen, and as I poured the mixture into those cute little cupcake liners, I could hardly contain my excitement. When my friends arrived, their eyes lit up at the sight of these little beauties. With toppings like fresh berries and drizzled chocolate, they were an instant hit—and the compliments kept rolling in. It was in that moment I realized food brings people together, and mini cheesecakes? They’re like bite-sized love notes. Since then, I’ve had a soft spot for this recipe, and I can’t wait for you to experience the same joy!
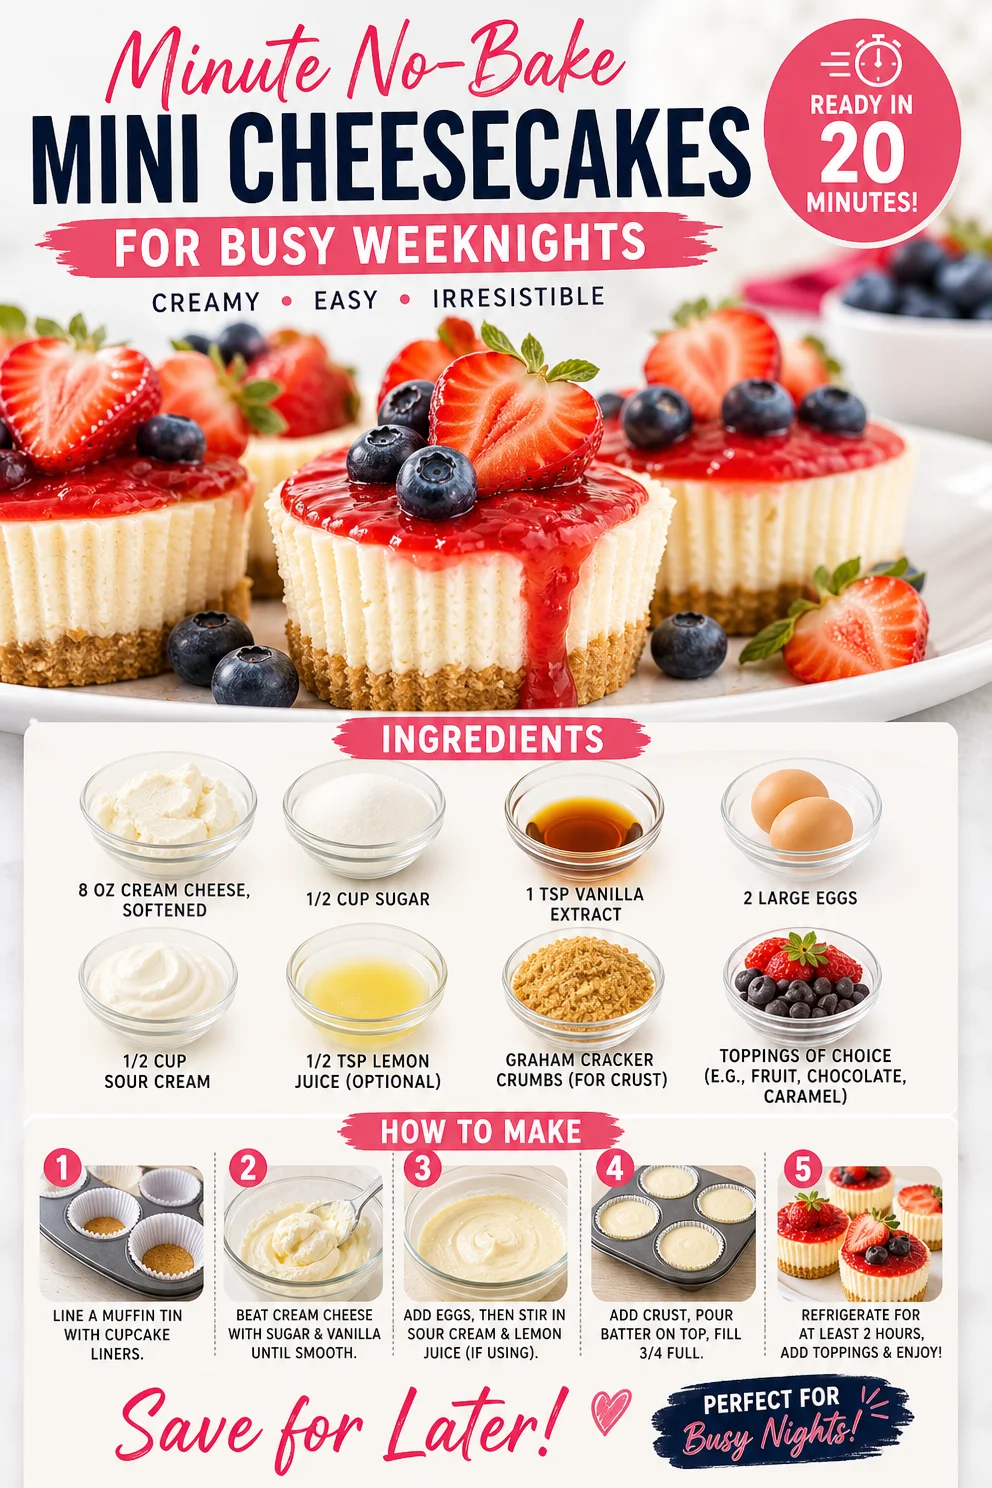
Ingredients
To create these mouthwatering mini cheesecakes, you’ll need the following ingredients:
-
8 oz cream cheese, softened
- This is the star of the show! Make sure it’s softened to room temperature so it blends seamlessly into a creamy mix. If you need a dairy-free option, try vegan cream cheese.
-
1/2 cup sugar
- Sweetness is essential for balancing the rich cream cheese. You can swap this with honey or maple syrup for a healthier alternative.
-
1 tsp vanilla extract
- Pure vanilla extract elevates the flavor profile and adds that lovely aromatic touch. If you’re in a pinch, vanilla extract powder works, too!
-
2 large eggs
- Adding eggs will help set the cheesecake while baking and provide that wonderful texture. For vegans, try using flaxseed meal or unsweetened applesauce as a substitute.
-
1/2 cup sour cream
- This adds creaminess and a slight tang, which contrasts beautifully with the sweetness. Greek yogurt is a fantastic substitute if you’re looking for a lighter option.
-
1/2 tsp lemon juice (optional)
- A splash of lemon juice can brighten up the flavors. If you’re not a fan, you can skip it or add a hint of lemon zest instead.
-
Graham cracker crumbs (for crust)
- Crush up some graham crackers for an easy and tasty crust! For a gluten-free alternative, try almond flour or gluten-free cookie crumbs.
-
Toppings of choice (e.g., fruit, chocolate, caramel)
- Get creative! From fresh berries to chocolate ganache, the sky’s the limit when it comes to toppings.
Step-by-Step Instructions
Now, let’s roll up those sleeves and get cooking! Here’s how to whip up these delightful mini cheesecakes:
1. Preheat Your Oven
Start by preheating your oven to 325°F (163°C). This ensures your cheesecakes cook evenly. While it’s warming up, you can prepare your crust!
2. Make the Graham Cracker Crust
In a mixing bowl, combine about 1 cup of graham cracker crumbs with 4 tablespoons of melted butter and 2 tablespoons of sugar. The mixture should resemble wet sand. If it feels too dry, add a little more melted butter.
3. Press the Crust into Muffin Tins
Line a muffin tin with cupcake liners for easy removal later. Spoon about a tablespoon of the crust mixture into each liner and firmly press it down. A shot glass or measuring cup works wonders for this! The goal is to create a nice, compact base that’ll hold up the creamy goodness on top.
4. Beat Together the Cream Cheese and Sugar
In a large bowl, use an electric mixer to beat the softened cream cheese and the 1/2 cup of sugar together until it’s light and fluffy. This usually takes about 2-3 minutes. Make sure to scrape down the sides of the bowl to get all that delicious cream cheese incorporated.
5. Add the Eggs One at a Time
Next, add the two large eggs, one at a time, mixing thoroughly after each addition until well combined. This step helps ensure you get a smooth and creamy cheesecake filling.
6. Incorporate the Sour Cream and Vanilla
Now, mix in the sour cream, vanilla extract, and lemon juice (if using). Beat until everything is fully blended. This is the moment when you’ll want to steal a taste. Just a spoonful—it’s oh-so-good!
7. Pour the Batter Over the Crusts
Carefully pour the cheesecake filling over each crust until they’re about 3/4 full. Feel free to use a scoop or measuring cup for accuracy.
8. Bake
Pop the muffin tin into your preheated oven and bake for 18-20 minutes. You’ll know they’re done when the edges are set but the centers still have a slight jiggle. This ensures a creamy interior without overcooking.
9. Cool and Chill
Once they’re done, turn off the oven and let them cool inside for about 10 minutes. This prevents cracks from forming. After cooling, transfer the cheesecakes to the fridge for at least 2 hours (or preferably overnight). This step is crucial for achieving that creamy texture and flavor!
10. Add Your Favorite Toppings
Once chilled, it’s time for the fun part! Top your mini cheesecakes with fresh berries, drizzles of chocolate or caramel, or even a sprinkle of nuts. The choice is yours!
Serving Suggestions
When it comes to serving, let your creativity shine! Arrange the mini cheesecakes on a beautiful dessert platter, garnished with mint leaves for an extra pop of color. You could also serve them in decorative cupcake liners to enhance their visual appeal. They’re perfect for parties, potlucks, or just enjoying with your favorite company!
Recipe Variations
Feeling adventurous? Here are some creative twists to customize your mini cheesecakes:
- Chocolate Caramel Delight: Swirl in some melted chocolate before baking and top with caramel drizzle after chilling.
- Berry Bliss: Stir in blueberry or raspberry puree into the cheesecake batter for fruity goodness, then top with fresh fruit.
- Espresso Infusion: Add a teaspoon of instant espresso powder to the batter for a coffee-flavored treat that coffee lovers will adore.
- Pumpkin Spice: Swap in pumpkin puree with cinnamon and nutmeg to get that fall vibe in every bite!
- Nutty Crunch: Stir in chopped nuts into the batter for an added crunchy texture and flavor bursts.
Chef’s Notes
Over the years, I’ve made quite a few variations of this recipe, experimenting with different flavors and toppings. One of my funniest kitchen stories? I once used a silicone mold that was meant for ice cubes, thinking it would make adorable mini cheesecakes. They turned out a bit too small and were hard to handle—but they were a hit nonetheless! It was a lesson learned on portion sizes, and ever since then, I stick with muffin tins for that perfect bite.
FAQs and Troubleshooting
1. Why are my cheesecakes cracking?
- Cracks usually happen due to rapid temperature changes or overbaking. To avoid this, allow them to cool gradually in the oven with the door slightly ajar.
2. Can I make these ahead of time?
- Absolutely! Mini cheesecakes can be made a day or two in advance. Just keep them covered in the fridge until you’re ready to serve.
3. How do I prevent the crust from being too soggy?
- Make sure your butter is fully incorporated with the crumbs, and consider pre-baking the crust for 5 minutes before adding the filling for that extra crunch.
4. Can I freeze the mini cheesecakes?
- Yes, you can! Just wrap them tightly in plastic wrap and then foil. They store well for about 2-3 months. Thaw in the refrigerator before serving.
Nutritional Info
(Here, you might want to include basic nutritional information per serving. This is optional based on your preference and audience.)
And there you have it, my friends! Mini cheesecakes that are bound to become a staple in your dessert repertoire. With their luscious flavors and endless customization options, they fit the bill for any occasion. Remember, cooking is all about enjoying the journey and creating cherished memories around the table. I can’t wait to hear how your mini cheesecakes turn out! Enjoy every bite, and happy baking!
PrintMini Cheesecakes

Delightful mini cheesecakes topped with your favorite ingredients, perfect for any occasion.
- Prep Time: 15 minutes
- Cook Time: 20 minutes
- Total Time: 135 minutes
- Yield: 12 servings 1x
- Category: Dessert
- Method: Baking
- Cuisine: American
- Diet: Vegetarian
Ingredients
- 8 oz cream cheese, softened
- 1/2 cup sugar
- 1 tsp vanilla extract
- 2 large eggs
- 1/2 cup sour cream
- 1/2 tsp lemon juice (optional)
- Graham cracker crumbs (for crust)
- Toppings of choice (e.g., fruit, chocolate, caramel)
Instructions
- Preheat your oven to 325°F (163°C).
- Combine about 1 cup of graham cracker crumbs with 4 tablespoons of melted butter and 2 tablespoons of sugar for the crust.
- Line a muffin tin with cupcake liners and press the crust mixture into each liner.
- Beat the softened cream cheese and sugar together until light and fluffy.
- Add the eggs one at a time, mixing thoroughly after each addition.
- Mix in the sour cream, vanilla extract, and lemon juice.
- Pour the cheesecake filling over each crust until about 3/4 full.
- Bake for 18-20 minutes or until the edges are set but the centers still jiggle slightly.
- Cool in the oven for about 10 minutes, then refrigerate for at least 2 hours.
- Top with your favorite toppings before serving.
Notes
Can be made a day or two in advance. Excellent for parties and gatherings.
Nutrition
- Serving Size: 1 cheesecake
- Calories: 200
- Sugar: 10g
- Sodium: 150mg
- Fat: 10g
- Saturated Fat: 6g
- Unsaturated Fat: 4g
- Trans Fat: 0g
- Carbohydrates: 20g
- Fiber: 1g
- Protein: 3g
- Cholesterol: 35mg
Keywords: cheesecake, dessert, mini dessert, sweet treat, baking