Easy Honey Cake (Medovik) Recipe: A Sweet Slice of Nostalgia
Welcome back to SavoryAddict! Today, we’re diving into a delightful treasure from my kitchen: Easy Honey Cake, also known as Medovik. This isn’t just any cake; it’s a warm, inviting hug wrapped in layers of sweetness and nostalgia. It’s the kind of dessert that fills your home with an irresistible aroma and brings everyone to the kitchen, asking, “What’s cooking?”
What I love most about this Honey Cake is how deeply it resonates with memories of gatherings—family dinners, birthday parties, and casual Sunday brunches. The blend of honey and comforting spices creates a subtle yet inviting flavor profile that’s perfect for any occasion. And guess what? It’s easy to make, using ingredients that most of us probably already have lying around the house. No ultra-rare finds here, my friends! Just simple, real food that tastes phenomenal.
The best part about baking this cake is that it’s adaptable—whether you’re craving something sweet for your afternoon tea or a special treat for a loved one, this Honey Cake has got you covered. Plus, I’ll share some creative variations to spice things up! Let’s channel our inner bakers and get started!
A Sweet Memory
Every time I bake Honey Cake, I’m transported back to my grandmother’s kitchen. Picture this: a bustling space filled with laughter, bustling relatives, and the rich smell of honey wafting through the air. My grandmother would whip up her famous Medovik for Sunday family dinners, and as soon as it was out of the oven, we all huddled around the table, eagerly awaiting our slice.
She had this incredible knack for improvising, adding a pinch of this and a dash of that, depending on what was fresh or available. I remember the first time she let me measure the flour. I was maybe six, and my tiny hands struggled with the big, old measuring cup, but she guided me patiently. Watching her decorate the cake like a masterpiece while sneaking me pieces of leftover batter will forever be etched in my memory.
Now, whenever I make this cake, I feel my grandmother’s warmth and wisdom, and I can’t help but smile. It’s more than just a dessert; it’s a little slice of my family history, and I’m thrilled to share this cherished recipe with you!
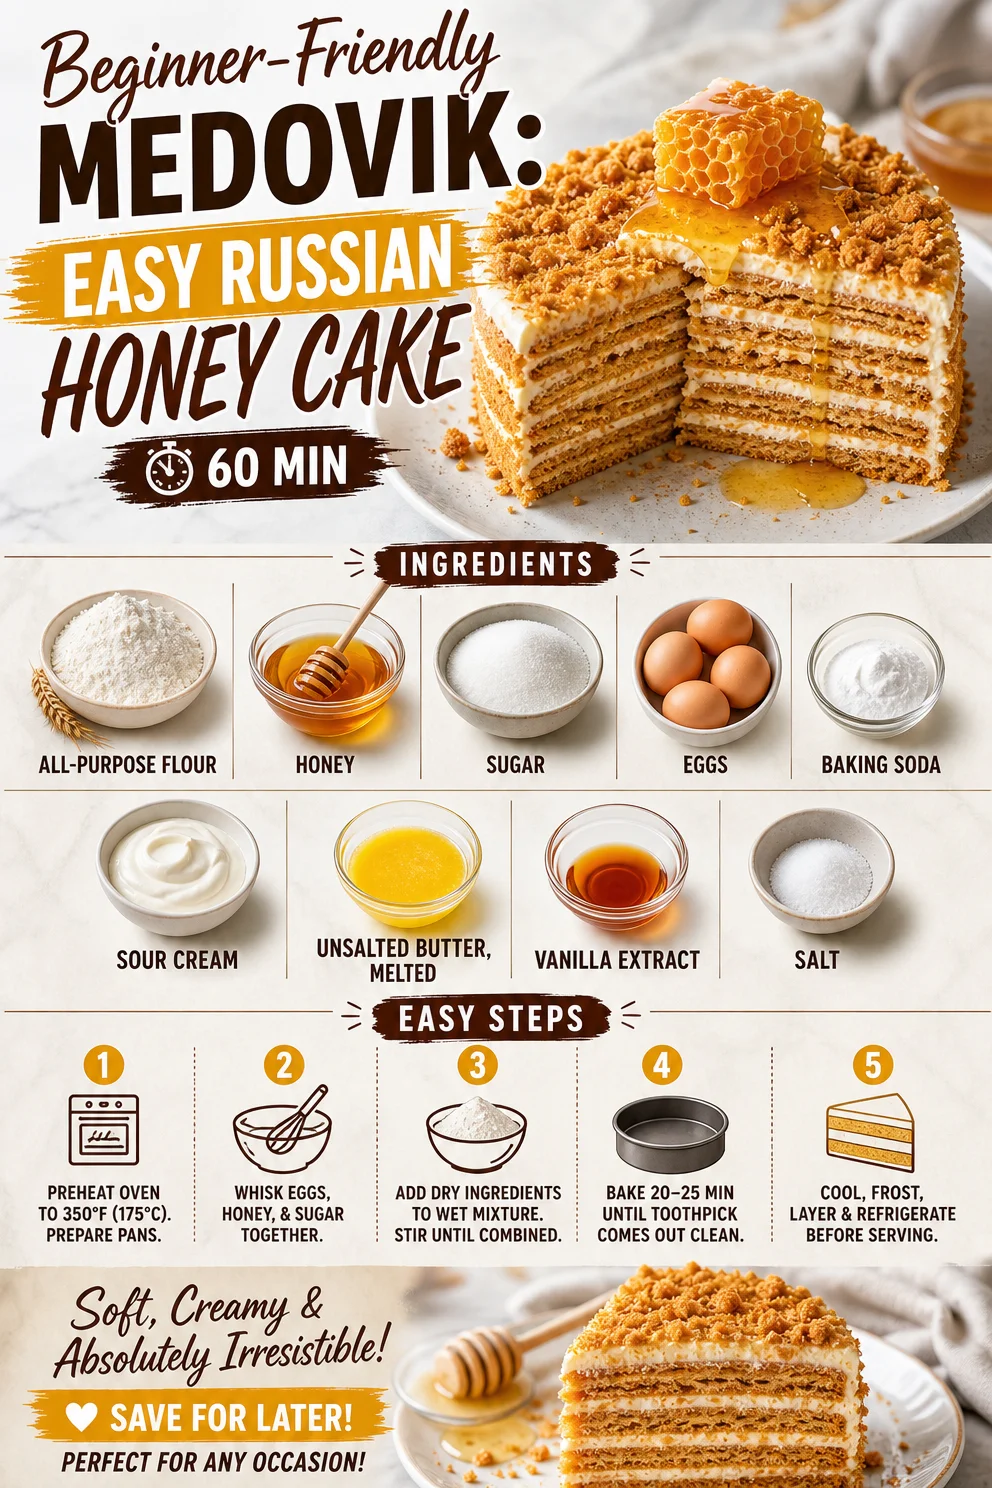
Ingredients
Here’s what you’ll need for our Easy Honey Cake:
-
2 cups all-purpose flour
The backbone of our cake! While all-purpose flour works perfectly, you can substitute half with whole wheat flour for a nuttier flavor and a bit more density. -
1 cup honey
The star of the show! Use a good-quality honey for the best results. If you’re feeling adventurous, try a flavored variety like clover or wildflower. If you need a substitute, maple syrup can bring a nice twist to the flavor. -
1 cup sugar
Sweetness is key! You can swap this with coconut sugar for a more caramel-like flavor, or even reduce the amount to make it less sweet, depending on your taste. -
4 large eggs
Eggs help bind our ingredients and provide moisture. If you’re vegan, a flaxseed egg works wonderfully—just mix one tablespoon of ground flaxseed with two and a half tablespoons of water and let sit for a few minutes until it thickens. -
1 teaspoon baking soda
This helps the cake rise and gives it a light texture. Make sure it’s fresh for the best results! -
1/2 cup sour cream
Adding richness and moisture, sour cream is a must. You can substitute Greek yogurt if that’s what you have on hand, or use a dairy-free option for a vegan version. -
1/4 cup unsalted butter, melted
Butter adds a delicious richness. Feel free to use coconut oil for a dairy-free twist—just melt it similarly! -
1 teaspoon vanilla extract
Vanilla elevates the flavor profile. Don’t skip this! If you’re short on vanilla, a splash of almond extract can be a fun alternative. -
Pinch of salt
Just a touch enhances all the flavors. Trust me, you don’t want to skip this either!
Step-by-Step Instructions
Now that we have our ingredients lined up, let’s get our bake on! Here’s how you’ll create this mouthwatering Honey Cake, step by step:
-
Preheat Your Oven:
Start by preheating your oven to 350°F (175°C). This ensures your cake bakes evenly and beautifully. Trust me, there’s nothing worse than a cake that bakes unevenly! -
Prepare the Pan:
Grease a 9-inch round cake pan with butter or cooking spray, then line the bottom with parchment paper. This little step simply makes your life easier when it’s time to release the cake. -
Mix Wet Ingredients:
In a large mixing bowl, combine the honey, sugar, eggs, and melted butter. Use a whisk to mix everything together until it’s beautifully combined. If you happen to spill some honey (because, let’s be honest, honey can be a little sticky!), no stress! Just whip out a little dish soap and water to clean it up quickly. -
Add the Sour Cream and Vanilla:
Gently fold in the sour cream and vanilla extract. This is where the magic begins; the mixture will become creamy and delicious. It’s hard not to sneak a taste here—you’ve been warned! -
Combine Dry Ingredients:
In a separate bowl, whisk together the flour, baking soda, and salt. This ensures even distribution of the leavening agent. It might be tempting to skip this step, but trust me, it’s worth it for the fluffy end result! -
Combine Wet and Dry:
Gradually add the dry mixture to the wet mixture, stirring gently until just combined. Don’t overmix—lumpy batters are encouraged! It’s a sign of a tender cake. If you see a floury patch or two, that’s cool; they’ll mix when you pour it into the pan. -
Pour and Smooth:
Pour the batter into your prepared pan and smooth out the top with a spatula. It doesn’t have to be perfect; we’re going for cozy here, not competition-level cake! -
Bake to Perfection:
Pop your pan into the oven and bake for 25-30 minutes or until a toothpick comes out clean when inserted into the center. Your kitchen will start to smell heavenly at this point, so don’t be surprised if you start getting visitors! -
Cool It Down:
Once baked, remove the cake from the oven and let it cool in the pan for about 10 minutes before carefully transferring it to a wire rack to cool completely. Patience is essential here; we don’t want to ruin our masterpiece by cutting it too soon! -
Slice and Serve:
Once cooled, slice your Honey Cake into wedges and serve! It’s delightful as is, but if you’re feeling fancy, dust with powdered sugar or drizzle with a little more honey for that extra flair.
Serving Suggestions
Plating is an art, and your Honey Cake deserves the spotlight! Here are some serving suggestions to make it even fancier:
- Serve warm with a dollop of whipped cream or a scoop of vanilla ice cream for extra decadence.
- Top each slice with fresh berries or sliced bananas. The tartness of the berries pairs beautifully with the sweetness of the cake!
- Drizzle a little extra honey or a glaze made from powdered sugar and milk on top before serving for that wow factor.
Recipe Variations
Want to switch up this classic recipe? Here are some exciting variations to try:
- Spiced Honey Cake: Add a teaspoon of cinnamon or ginger for a warm, spiced flavor that’s perfect for fall.
- Nutty Delight: Toss in some chopped nuts, like walnuts or pistachios, into the batter for added crunch.
- Fruit-Infused: Fold in some finely chopped apples or pears for a fruity twist that will bring some natural sweetness and moisture.
- Chocolate Drizzle: Melt dark chocolate and drizzle it over the cooled cake for a rich addition that makes it feel indulgent.
- Citrus Zest: Add a teaspoon of lemon or orange zest to brighten up the flavors—citrus and honey are a match made in heaven!
Chef’s Notes
Every time I make this Honey Cake, I’m reminded of how recipes evolve. My grandmother’s original recipe was simple—a beautiful cake just on its own. Over the years, I’ve taken that foundational recipe and tweaked it, adding my own little twists, much like my grandmother did. These changes have made it uniquely mine while still paying homage to her culinary genius.
And let me share a little tidbit: I once forgot to add the baking soda in a rush and ended up with a delicious, dense dessert that my friends called "honey bread." It was a happy accident that’s become a go-to recipe for those lazy Sunday brunches!
FAQs and Troubleshooting
1. Why isn’t my cake rising?
Make sure your baking soda is fresh! Old leavening agents can lead to a flat cake. If you have doubts, do a quick test: Mix a teaspoon of baking soda with a splash of vinegar. If it fizzes, it’s good to go!
2. My cake turned out too dry—what happened?
This could be due to overbaking or too much flour. When you measure flour, fluff it up first and then spoon it into your measuring cup to prevent packing it down.
3. Can I make this cake ahead of time?
Absolutely! This Honey Cake actually tastes better after a day or two, as the flavors meld beautifully. Store it in an airtight container at room temperature for up to 3 days or in the fridge for up to a week.
4. How do I store leftover cake?
Keep it covered at room temperature for short-term storage, or wrap slices in plastic wrap for freezing. It’ll keep in the freezer for about a month—just thaw it on the counter for about an hour before serving!
Nutritional Info
For those keeping an eye on nutrition, here’s a rough estimate per slice (based on 12 slices):
- Calories: 250
- Total Fat: 8g
- Saturated Fat: 4g
- Cholesterol: 40mg
- Carbohydrates: 42g
- Dietary Fiber: 1g
- Sugars: 18g
- Protein: 5g
Whether you’re an experienced baker or just starting, the joy of making this Honey Cake is all about the love and memories it brings. I hope you’ll bring a little bit of that magic into your kitchen! Remember, cooking is an adventure—don’t be afraid to experiment.
Now, roll up those sleeves and get baking—you’re going to love this! Happy baking from the SavoryAddict crew!
PrintEasy Honey Cake (Medovik)
A delightful and nostalgic Easy Honey Cake, warm and inviting, perfect for any occasion.
- Prep Time: 15 minutes
- Cook Time: 30 minutes
- Total Time: 45 minutes
- Yield: 12 servings 1x
- Category: Dessert
- Method: Baking
- Cuisine: Russian
- Diet: Vegetarian
Ingredients
- 2 cups all-purpose flour
- 1 cup honey
- 1 cup sugar
- 4 large eggs
- 1 teaspoon baking soda
- 1/2 cup sour cream
- 1/4 cup unsalted butter, melted
- 1 teaspoon vanilla extract
- Pinch of salt
Instructions
- Preheat your oven to 350°F (175°C).
- Grease a 9-inch round cake pan with butter or cooking spray, then line the bottom with parchment paper.
- Combine the honey, sugar, eggs, and melted butter in a large mixing bowl. Mix until combined.
- Fold in the sour cream and vanilla extract until creamy.
- Whisk together the flour, baking soda, and salt in a separate bowl.
- Add the dry mixture gradually to the wet mixture, stirring gently until just combined.
- Pour the batter into the prepared pan and smooth out the top.
- Bake for 25-30 minutes or until a toothpick comes out clean.
- Cool the cake in the pan for about 10 minutes, then transfer to a wire rack to cool completely.
- Slice the cake into wedges and serve.
Notes
For a fancier presentation, dust with powdered sugar or drizzle with honey before serving.
Nutrition
- Serving Size: 1 slice
- Calories: 250
- Sugar: 18g
- Sodium: 80mg
- Fat: 8g
- Saturated Fat: 4g
- Unsaturated Fat: 4g
- Trans Fat: 0g
- Carbohydrates: 42g
- Fiber: 1g
- Protein: 5g
- Cholesterol: 40mg
Keywords: honey cake, Medovik, dessert, easy cake recipe, nostalgic recipes