
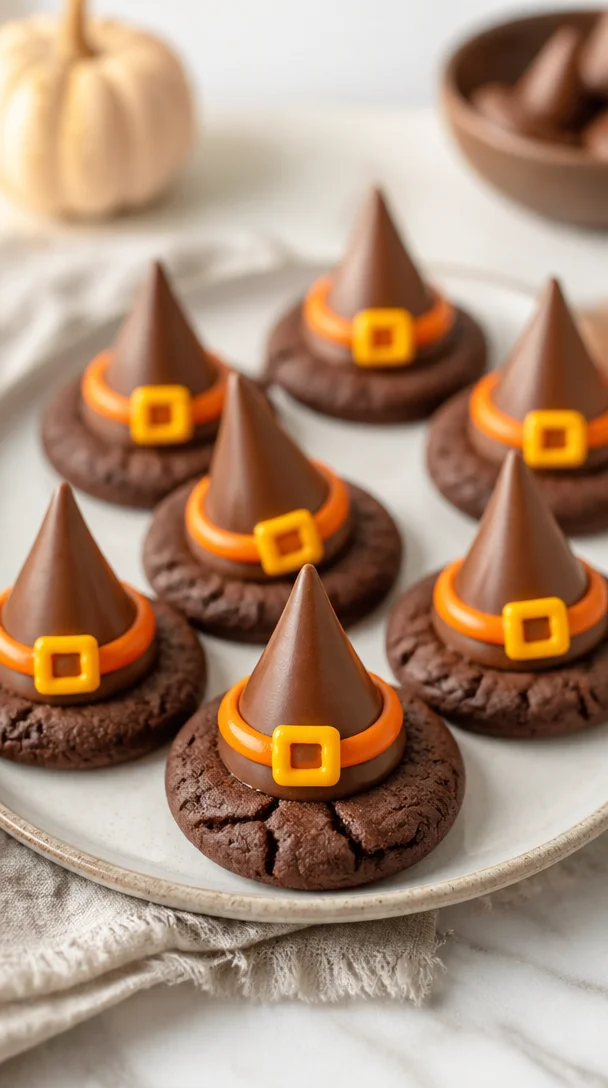
Witch Hat Cookies with Chocolate Kisses
Introduction
Welcome, my culinary friends! Today, we’re diving into a delightful treat that is sure to conjure up smiles and compliments at your next gathering. Let’s talk about the charming Witch Hat Cookies, adorned with glistening chocolate kisses that create a whimsical look perfect for Halloween or any festive occasion where fun is in the air. With each bite, you’ll taste the buttery sweetness of the cookies, contrasted beautifully by the rich chocolate from the kisses.
What I love most about these cookies is their playful nature and the ease with which they can be made. Remember the magical feeling of baking as a kid, mixing flour and sugar, transforming simple ingredients into something wonderfully scrumptious? That’s the spirit I hope to share with you today!
Join me as we reminisce about childhood memories filled with sugar, spice, and everything nice. Picture yourself in a cozy kitchen, laughter filling the air, as scents of baking waft through. These Witch Hat Cookies don’t just taste incredible; they also bring a nostalgic warmth that we all cherish.
So, don your aprons, preheat your ovens, and let’s create some enchanting treats together that will undoubtedly spark joy and might even leave your friends guessing about the magic behind them!
Personal Story
I still remember the first time I made Witch Hat Cookies with my niece, who was about six years old at the time. The Halloween season was in full swing, leaves swirling outside, and the excitement was palpable. I had the idea of making these quirky cookies, thinking they would be a festive twist to our usual treats.
As we gathered the ingredients, her eyes lit up when I revealed the chocolate kisses; they were like little treasures waiting to be found. Flour flew, laughter echoed, and despite a couple of stray cookie dough globules on the floor, we managed to create a batch of cookies that looked slightly lopsided but were filled with the perfect touch of love.
After they came out of the oven and had cooled just enough to handle, we transformed these modest disks into cute witch hats. Each cookie was topped with a kiss, and we added a sprinkle of edible glitter—which, let me tell you, turned our kitchen into a sparkly space of joy. That day wasn’t just about baking; it was about bonding and creating shared memories that we still talk about. That’s the kind of magic I want you to feel in your kitchen today.
Ingredients
To make these delightful Witch Hat Cookies, you’ll need the following ingredients:
- 1 cup (226g) unsalted butter, softened: A must for rich flavor, you can substitute with margarine, though butter gives the best taste and texture.
- 1 cup (200g) granulated sugar: Sweeten the deal! You can try brown sugar for a slight caramel flavor.
- 2 large eggs: Essential for binding; you can use flaxseed eggs or applesauce for a vegan option.
- 2 teaspoons vanilla extract: Adds depth; don’t skip this! If you’re out, almond extract is a lovely alternative.
- 2 cups (240g) all-purpose flour: The base of your cookies. Ensure you sift it for a lighter texture.
- 1 cup (120g) unsweetened cocoa powder: What makes these cookies chocolatey! You can use Dutch-processed cocoa for a milder taste.
- 1 teaspoon baking soda: Helps cookies rise; don’t confuse it with baking powder!
- 1/2 teaspoon salt: Balances the sweetness; a tiny pinch goes a long way.
- 24 chocolate kisses: These bring the witch hat look to life! If you have a nut allergy, try a chocolate truffle or a small dollop of frosting instead.
- Edible glitter or sprinkles (optional): For that magical touch—totally optional, but why not add some sparkle?
Step-by-Step Instructions
-
Preheat Your Oven: Start by preheating your oven to 350°F (175°C). This ensures that your cookies will bake evenly.
-
Mix the Butter and Sugar: In a large mixing bowl, cream the softened butter and sugar together. Beat them on medium speed until the mixture is light and fluffy, about 3-5 minutes. This step is critical as it incorporates air into the batter for a lighter cookie.
-
Add Eggs and Vanilla: Beat in the eggs one at a time, then stir in the vanilla extract. The mixture should be well-combined and smooth. If it looks a bit separated, don’t worry; it will come together with the dry ingredients.
-
Combine Dry Ingredients: In a separate bowl, whisk together the flour, cocoa powder, baking soda, and salt. This ensures that the leavening agent and cocoa are evenly distributed, preventing any clumps.
-
Mix Dry with Wet Ingredients: Gradually add the dry ingredients to the wet mixture, mixing until just combined. Overmixing can lead to tough cookies, so stop as soon as you see no dry flour!
-
Shape the Cookies: Using a teaspoon or a cookie scoop, portion out the dough and roll it into balls. Place them on a baking sheet lined with parchment paper, spaced about 2 inches apart. They will spread while baking, so give them room to grow!
-
Bake the Cookies: Pop them in the preheated oven and bake for about 10-12 minutes. You want the edges to be set and the center slightly soft. They will firm up as they cool.
-
Add Chocolate Kisses: Once your cookies are out of the oven and while they are still warm, gently press a chocolate kiss into the center of each cookie. It’ll melt just enough to adhere to the cookie nicely.
-
Cool and Decorate: Allow the cookies to cool on the baking sheet for about 5 minutes, then transfer them to a wire rack to cool completely. If using edible glitter or sprinkles, dust them on while the chocolate kiss is still melty for it to stick!
Serving Suggestions
These Witch Hat Cookies are best served fresh but can be kept in an airtight container for up to a week. For an extra festive presentation, serve them on a platter garnished with autumn leaves or under a decorative Halloween-themed napkin.
You can also pair these cookies with a glass of cold milk or hot chocolate, making for a perfectly cozy treat. It’s a delightful addition to any fall-themed party or a spooky get-together, and your guests will love the sweet surprise of chocolate kisses cleverly disguised as witch hats!
Recipe Variations
-
Peppermint Twist: Add 1/2 teaspoon of peppermint extract to the dough for minty cookies that bring a festive spark to Christmas gatherings.
-
Nutty Chef: Incorporate 1/2 cup of chopped nuts (like pecans or walnuts) into the dough for added crunch and flavor.
-
Darker Delight: Use dark chocolate kisses and a touch of espresso powder in the dough for an indulgently rich flavor.
-
Gluten-Free Option: Substitute the all-purpose flour for a gluten-free blend, ensuring that your cocoa powder is also gluten-free.
-
Fruity Twist: Top each kiss with a small piece of dried fruit (like cherries or apricots) before baking for an unexpected burst of flavor!
Chef’s Notes
Every time I bake these Witch Hat Cookies, I think back to that magical day in the kitchen with my niece. Cooking and baking are more than just following recipes; they’re about creating bonds and cultivating joy. As a chef, I’ve learned to embrace the mess—add a little extra flour here, a pinch of seasoning there—and let creativity flow!
Remember, the beauty of baking lies in experimenting. These cookies have evolved over time with different flavors and toppings, and I encourage you to make them your own. Don’t hesitate to get creative; sometimes the best recipes come from a touch of spontaneity!
FAQs and Troubleshooting
-
Why did my cookies spread too much?
Make sure your butter isn’t too soft; room temperature is best. If your dough is too warm, chill it in the fridge for 30 minutes before baking. -
Can I freeze these cookies?
Absolutely! Freeze the cookies before pressing in the kisses. Once baked, store them in an airtight container. Just pop them in the microwave for a few seconds to warm them up again! -
My cookies are too dry. What went wrong?
This could be due to adding too much flour. Always spoon and level your flour; don’t scoop directly from the bag! -
How can I ensure my cookies are soft?
Avoid overbaking. They may look slightly underdone when you take them out, but they will continue to cook on the baking sheet.
Nutritional Info
These Witch Hat Cookies are a treat, and while charming, it’s wise to enjoy them in moderation! Each cookie contains approximately:
- Calories: 120
- Fat: 6g
- Carbohydrates: 16g
- Protein: 1g
Depending on the ingredient substitutions and variations you make, these values might change, allowing you to create a version that fits your dietary needs while still delivering that beloved taste.
Final Thoughts
Baking is all about sharing love, laughter, and occasionally a bit of kitchen chaos! I hope you feel inspired to add your own flair to these Witch Hat Cookies. Whether you’re making them for a festive celebration, a family gathering, or just to enjoy yourself, know that you’re creating something special.
So, gather your loved ones, get your hands a little floury, and enjoy this magical time in the kitchen. Remember, it’s not just about the cookies; it’s about the memories you’re making. Bon appétit!
PrintWitch Hat Cookies with Chocolate Kisses

Delightful Witch Hat Cookies topped with chocolate kisses, perfect for Halloween or festive gatherings.
- Prep Time: 15 minutes
- Cook Time: 12 minutes
- Total Time: 27 minutes
- Yield: 24 cookies 1x
- Category: Dessert
- Method: Baking
- Cuisine: American
- Diet: Vegetarian
Ingredients
- 1 cup (226g) unsalted butter, softened
- 1 cup (200g) granulated sugar
- 2 large eggs
- 2 teaspoons vanilla extract
- 2 cups (240g) all-purpose flour
- 1 cup (120g) unsweetened cocoa powder
- 1 teaspoon baking soda
- 1/2 teaspoon salt
- 24 chocolate kisses
- Edible glitter or sprinkles (optional)
Instructions
- Preheat your oven to 350°F (175°C).
- Mix the butter and sugar together until light and fluffy, about 3-5 minutes.
- Add eggs one at a time, then stir in the vanilla extract.
- Combine dry ingredients in another bowl: flour, cocoa powder, baking soda, and salt.
- Mix the dry ingredients with the wet mixture until just combined.
- Shape the dough into balls and place them on a lined baking sheet.
- Bake for about 10-12 minutes until the edges are set.
- Add a chocolate kiss on each cookie while they are still warm.
- Cool on a wire rack and decorate with edible glitter if desired.
Notes
For extra festive fun, serve with cold milk or hot chocolate. These cookies can be kept in an airtight container for up to a week.
Nutrition
- Serving Size: 1 cookie
- Calories: 120
- Sugar: 8g
- Sodium: 50mg
- Fat: 6g
- Saturated Fat: 4g
- Unsaturated Fat: 2g
- Trans Fat: 0g
- Carbohydrates: 16g
- Fiber: 1g
- Protein: 1g
- Cholesterol: 30mg
Keywords: Halloween cookies, witch hat cookies, chocolate cookies, festive desserts