
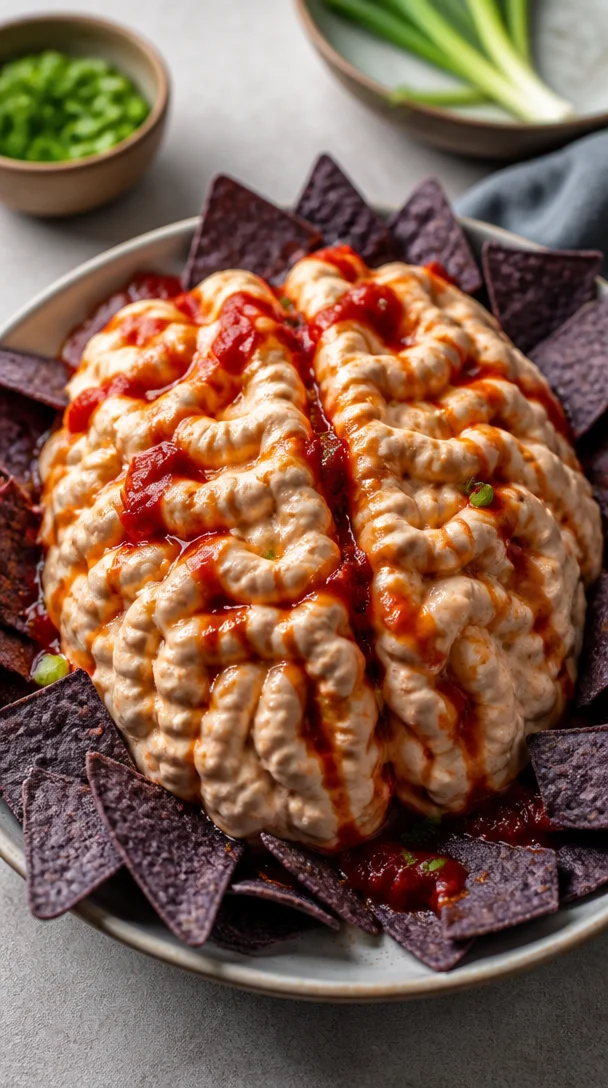
Zombie Brain Dip
Introduction
Welcome back, fellow culinary adventurers! Today, we’re diving into a dish that’s sure to be a conversation starter at your next gathering. Whether it’s a spooky Halloween bash or just a fun get-together with friends, the Zombie Brain Dip is as festive as it is delicious. Imagine a creamy, savory dip that looks like it came straight from a mad scientist’s laboratory, complete with a grisly brain-like appearance. But don’t be deceived—this playful dish packs a flavor punch that will leave everyone reaching for more.
Growing up in a family that loved celebrating every occasion with themed food, I’ve always believed that cooking should be as much about creativity as it is about flavor. This dip not only checks those boxes but also serves as a canvas for personal expression! Who doesn’t love a dish that’s both ghoulishly fun and mouthwateringly tasty? So grab your apron, let’s put on some eerie music, and get ready to whip up a batch of Zombie Brain Dip that will both surprise and delight your friends!
Personal Story
One of my fondest memories revolves around a Halloween party I attended back in college. The host was an aspiring chef, and his creativity in the kitchen truly shone through that night. He unveiled a dip that looked like something from a horror movie, complete with garnishes designed to look like worms (made from colored pasta) and edible eyeballs (grapes). The taste was incredible, but the presentation was what made it unforgettable. It sparked an idea in my mind—to create my own themed dishes that could be just as exciting!
Fast forward to today, and here we have the Zombie Brain Dip, inspired by that whimsical night. It captures the spirit of those fun gatherings while ensuring the flavors will have everyone talking—and not just about how it looks! This recipe has become a staple at my own Halloween parties, and I can’t wait to share it with you.
Ingredients
Here’s what you’ll need to create your eerie yet delicious Zombie Brain Dip:
-
8 oz cream cheese
The base of the dip, cream cheese offers a creamy texture. For a lighter option, substitute with Greek yogurt! -
1 cup salsa
This adds a kick of flavor and color. You can go for mild or spicy depending on your crowd’s taste buds! -
1 cup shredded cheese
A blend of cheddar and mozzarella works great for melty goodness. Substitute with vegan cheese if you want a dairy-free option. -
1 tsp garlic powder
A little garlic elevates the flavors. Fresh minced garlic is an excellent substitute for a bolder taste. -
1 tsp onion powder
For depth in flavor, you can replace this with finely chopped green onions if you prefer a fresh crunch. -
Optional: sliced olives
Black olives look eerily like eyeballs and can add a fun touch without affecting the dip’s flavor. -
Handful of tortilla chips or vegetable sticks for serving
The perfect vehicle for dipping—feel free to offer an assortment to cater to all preferences.
Step-by-Step Instructions
Now, let’s get hands-on and create this spooky masterpiece!
-
Prep the Cream Cheese
Start by letting the cream cheese sit at room temperature for about 30 minutes. This step is crucial! A softened cream cheese will combine smoothly with other ingredients, eliminating any lumps for a creamy texture. -
Mix the Base
In a medium mixing bowl, combine the softened cream cheese, salsa, garlic powder, and onion powder. Use an electric mixer or a sturdy spatula to blend until smooth. Don’t be shy with that mixer! The more incorporated, the better! -
Layer in the Cheese
Once your base is smooth, fold in your shredded cheese. Make sure to reserve a handful for garnishing on top. Mixing it in allows the flavors to intertwine while making sure it’s all gooey and cheesy. -
Shape the Dip
Now comes the fun part! Transfer your creamy mixture into a shallow dish or serving platter. To give it that classic “brain” shape, use a spatula to mold it into a brain-like form. Get creative here—this is your opportunity to have fun with the presentation! -
Add the Garnishes
With a handful of reserved shredded cheese, sprinkle it over the top to create a brain texture. If you have olives, slice them in half and place them strategically to resemble eyes throughout the dip. It helps to think of how you want it to look; the more you play around, the better it gets! -
Chill
Once decorated, pop your dip into the refrigerator for at least an hour. This chilling period helps meld the flavors while allowing the dip to set up, making it easier to serve. -
Serve and Delight
Bring it out just before your guests arrive—we want it to be fresh! Pair it with tortilla chips or vegetable sticks, and watch the laughter and fun unfold.
Serving Suggestions
Presenting your Zombie Brain Dip can be as entertaining as making it! Here are some ideas:
- Serve in a shallow bowl to enhance the brain effect. A white or black dish works best to contrast the colors of the dip.
- Place it on a spooky-themed platter with small “bloody” touches—think ketchup or more salsa drizzled around for that extra Halloween theme.
- For an added creepy factor, scatter some plastic spiders or eyeballs around the platter for decoration (just make sure to warn the guests!).
Recipe Variations
Let’s turn this classic dip into something even more fun! Here are some creative twists you might consider:
- Spicy Zombie Dip: Add chopped jalapeños into the mixture or top with a spicy pepper jack cheese layer for a fiery kick.
- Herbed Brain Dip: Mix in some fresh herbs like chives or cilantro for a fresh taste that contrasts with the richness of the cream cheese.
- Meaty Madness: Stir in some cooked crumbled sausage or bacon bits into the mix before chilling for a heartier version.
- Ultimate Veggie Version: Replace the cream cheese with a bean dip or hummus for a vegan-friendly option without losing the fun presentation.
- Layered Delight: Create layers—start with a bottom layer of black bean dip, then your brain mix, and top with guacamole for a tasting experience that’s out of this world!
Chef’s Notes
One of the best parts of cooking is how a recipe can evolve. This Zombie Brain Dip first started as a playful take on classic bean dips that seemed a little too mundane for a Halloween party, and now it has become a staple! I remember the first time I served it—the shock on my friends’ faces quickly turned to delight as they dove in for more. It’s all about the experience, right? And no matter how many times I make it, the laughter and creativity always bring back those cherished memories of cooking with family.
FAQs and Troubleshooting
-
What if my dip is too thick?
If the mixture seems too thick, simply add a bit more salsa until you achieve your desired consistency. Remember, we want it creamy! -
How can I make this ahead of time?
You can prepare the dip a day in advance. Just keep it covered in the fridge until you’re ready to serve. Garnish just before serving for a fresh presentation. -
Can I bake this dip?
Absolutely! If you prefer a warm dip, bake it at 350°F (175°C) for about 20 minutes or until bubbly and lightly golden on top. Just remember that this will change the look—no brain shape! -
What if I have leftovers?
If you have any leftover dip (which is rare!), store it in an airtight container in the fridge for up to three days. Just give it a good stir before serving again!
Nutritional Info
While indulgent, the Zombie Brain Dip can be tailored to meet various dietary needs, making it a versatile party dish. Here’s a rough nutritional breakdown per serving (based on a standard serving size):
- Calories: About 150
- Total Fat: 10g
- Saturated Fat: 5g
- Cholesterol: 30mg
- Sodium: 200mg
- Total Carbohydrates: 8g
- Dietary Fiber: 1g
- Protein: 5g
To make it lighter, consider swapping lower-fat cream cheese or using beans as a base. Adjusting serving sizes can help manage calorie counts—a smaller portion still brings the fun!
Final Thoughts
There you have it! Not only is the Zombie Brain Dip a hit during Halloween, but its playful nature allows it to shine at any party. As a passionate foodie and home cook, sharing these fun, whimsical dishes with you brings me joy. Remember, cooking isn’t just about the final product—it’s about the moments shared around the table.
I hope you and your friends enjoy this recipe as much as I do. Don’t hesitate to share your own creative spins or stories; I would love to hear them! Now, let’s get cooking and bring some zany fun into the kitchen!
PrintZombie Brain Dip
A creamy and spooky dip that resembles a brain, perfect for Halloween parties or fun gatherings.
- Prep Time: 30 minutes
- Cook Time: 0 minutes
- Total Time: 90 minutes
- Yield: 8 servings 1x
- Category: Appetizer
- Method: Chilling
- Cuisine: American
- Diet: Vegetarian
Ingredients
- 8 oz cream cheese
- 1 cup salsa
- 1 cup shredded cheese (cheddar and mozzarella)
- 1 tsp garlic powder
- 1 tsp onion powder
- Optional: sliced olives
- A handful of tortilla chips or vegetable sticks for serving
Instructions
- Prep the Cream Cheese: Let the cream cheese sit at room temperature for about 30 minutes.
- Mix the Base: Combine the softened cream cheese, salsa, garlic powder, and onion powder in a medium mixing bowl until smooth.
- Layer in the Cheese: Fold in the shredded cheese, reserving a handful for garnishing.
- Shape the Dip: Transfer the mixture to a shallow dish and mold it into a brain-like shape.
- Add the Garnishes: Sprinkle reserved shredded cheese on top and decorate with sliced olives to resemble eyes.
- Chill: Refrigerate for at least one hour to meld flavors.
- Serve and Delight: Bring out just before guests arrive and serve with tortilla chips or vegetable sticks.
Notes
For a healthier version, consider using Greek yogurt or vegan cheese. Experiment with garnishes and serving styles for added fun.
Nutrition
- Serving Size: 1 serving
- Calories: 150
- Sugar: 2g
- Sodium: 200mg
- Fat: 10g
- Saturated Fat: 5g
- Unsaturated Fat: 2g
- Trans Fat: 0g
- Carbohydrates: 8g
- Fiber: 1g
- Protein: 5g
- Cholesterol: 30mg
Keywords: Halloween, party dip, cream cheese dip, spooky recipes