
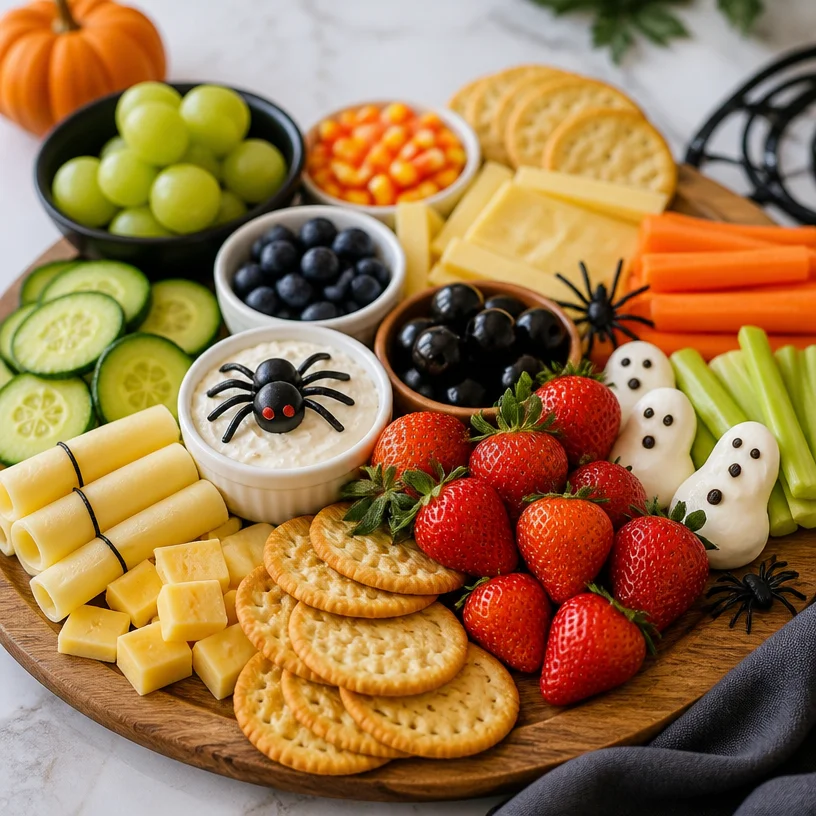
Halloween Snack Board: Scary Good Treats for a Spooktacular Celebration
As the leaves start to turn brilliant shades of orange and red, and the air fills with the crisp scent of autumn, we all know that Halloween is just around the corner! There’s something utterly magical about this time of year—the costumes, the decorations, and the thrill of a good scare. But one of my favorite parts? The food! That’s where the Halloween Snack Board comes into play.
Imagine gathering your friends and family around a beautifully arranged board filled with vibrant colors, spooky shapes, and a variety of flavors that will tantalize your taste buds. Not only is a snack board easy to assemble, but it’s also a fantastic centerpiece for any Halloween gathering, allowing your guests to nosh and mingle at their own pace. Let’s dive into how to create a Halloween Snack Board that’s not just visually striking but also packed with mouthwatering options that even the pickiest eaters will love!
A Spooky Snack with a Personal Touch
One of my fondest Halloween memories is from when I was a kid, back in my hometown. My grandmother had a knack for making every holiday special, and Halloween was no exception. Every year, she would host a spooky gathering at her home, complete with eerie decorations and an endless array of treats. I can still picture her kitchen table, where she’d display a beautifully arranged platter of veggies, cheeses, and fruits. It was our Halloween tradition to create “witch’s fingers” out of carrots and “monster mouths” from apple slices with almond “teeth.” Everyone would gather around, giggling at the spooky shapes while piling their plates high with goodies. That infectious joy and creativity in the kitchen stayed with me, and it inspired me to whip up a Halloween Snack Board that captures that same spirit of fun and togetherness.
Ingredients
For our Halloween Snack Board, you’ll need a selection of colorful and tasty ingredients. Here’s the full lineup:
-
Fruits: Choose a mix of seasonal fruits like apples, grapes, and oranges. These add a refreshing crunch. Substitute with any favorite fruits you have on hand!
-
Vegetables: Think bell peppers, carrots, and cucumbers. These are not only crunchy but also bring a pop of color. You can easily swap veggies based on your preferences or what’s in season—broccoli or cauliflower work great too!
-
Cheese: Opt for a variety of cheeses like cheddar, brie, and pepper jack. Cheese is always a crowd-pleaser, and you can swap it for vegan cheese to accommodate dietary needs.
-
Crackers: Add different types of crackers, such as whole grain and buttery varieties, to give texture and flavor contrast. Feel free to use gluten-free options if required!
-
Candy: A selection of Halloween-themed candies—think gummy worms, chocolate pumpkins, and candy corn (if you dare!). You can play around with healthier alternatives, such as dark chocolate-covered nuts, if you want to keep it a bit on the healthier side.
-
Dips: Include a few fun dips like hummus or a spooky-themed guacamole for added flavor and creativity. You can get creative with flavors, like roasted red pepper or spicy black bean hummus!
Step-by-Step Instructions
-
Gather Your Ingredients: Before diving into the assembly, gather all your ingredients on the countertop. This makes it easier to visualize your design. I love laying everything out because it sparks creativity!
-
Choose Your Board: Select a large platter or wooden cutting board—its size will dictate how much you can create. A wooden board adds a rustic charm, perfect for a Halloween vibe!
-
Start with a Base: Place your cheese selections first. I usually use larger pieces to create focal points. Think of how you want the flavors to flow—the creamy brie next to the sharp cheddar can create a sinfully delicious combination.
-
Add Fruits and Vegetables: Next, add small bowls or clusters of fruits that will complement the cheeses. I love arranging apple slices next to cheese for that sweet-and-salty delight. For veggies, create fun shapes—carrot sticks can be standing in for "witches’ fingers,” and cucumber rounds can add some whimsy.
-
Insert Crackers: Now, fill the spaces with crackers. Stand them vertically for an organized look or let them lay flat as a crunchy landscape. Choose different colors and shapes for visual variety.
-
Sprinkle in the Candy: Add your Halloween-themed candy in clusters. Place gummy worms in "spider webs" made from string cheese or let chocolate pumpkins pop among the fruits. This playful element is sure to be a hit!
-
Add Dips: Finally, finish up with your dips in small bowls. A spooky guacamole (add some food coloring for an eerie effect!) or vibrant hummus can enhance both the flavors and visual appeal.
-
Garnish and Enjoy: Take a step back and admire your creation! If you like, sprinkle some herbs or edible flowers for an extra touch. Don’t forget to encourage your guests to dig in and enjoy this playful spread!
Serving Suggestions
When serving your Halloween Snack Board, consider the presentation. Lay out fun napkins and a few spooky-themed decorations to set the mood. You can even label certain items with cute name tags—who wouldn’t want to try “Mummy’s Veggie Sticks” or “Witch’s Brew Dip”? Gracefully arrange the board on a buffet table for guests to help themselves, or make it an interactive centerpiece at the dining table. It’ll spark conversation and laughter as everyone builds their plates with a little bit of everything!
Recipe Variations
- Spooky Sweet Board: Turn it into a dessert board with cookies, chocolate-covered fruits, and cupcakes topped with Halloween-themed sprinkles.
- Savory Twist: Incorporate small charcuterie items like salami, pepperoni, or olives to add a savory kick.
- Themed Shapes: Use cookie cutters to slice cheeses and fruits into ghosts or pumpkin shapes—cutting out fun shapes adds a pinch of whimsy!
- Nut-Free Options: Swap in roasted chickpeas or other nut-free snacks for those avoiding allergic ingredients.
- Plant-Based Board: For a whole food plant-based option, replace dairy cheeses with plant-based alternatives and load up on roasted veggies, chickpea dips, and fruits.
Chef’s Notes
When I created my first Halloween Snack Board, I overthought every detail—colors, arrangements, flavors. But my advice? Embrace the chaos! It’s all about having fun. Plus, the best part of these boards is that there’s no right or wrong way to create them. Your creativity shines through the final presentation. Over the years, I’ve learned that sometimes it’s the silly shapes and playful combinations that lead to the best memories—much like my grandmother’s kitchen, filled with laughter and love.
FAQs and Troubleshooting
1. What if I’m short on time?
No worries! Pre-cut veggies and fruits are available at grocery stores, which can save you time. Also, don’t hesitate to simplify your board—focus on a few key ingredients that you know your guests love!
2. How do I keep things fresh?
To maintain the freshness of your fruits and veggies, try to assemble your board within an hour of serving. If you’re preparing in advance, wrap everything well and refrigerate until it’s time to serve.
3. Guests have dietary restrictions—what should I do?
It’s always best to ask your guests ahead of time! A variety of ingredients helps accommodate most diets. Label the items with any common allergens (nuts, dairy, gluten) to keep it safe for everyone.
4. How long can I leave the board out?
Generally speaking, it’s best to consume the snacks within two hours. However, keep an eye on perishables like dips and dairy cheeses, especially in warm settings.
Nutritional Info
While this snack board is mainly about enjoyment, you can incorporate healthier options by choosing whole-grain crackers or swapping out traditional candies for healthier treats. Tailoring the board to your family’s tastes can keep it satisfying and enjoyable for everyone.
So there you have it—your go-to guide for putting together a Halloween Snack Board that’s sure to impress! Whether you’re hosting a Halloween bash or enjoying a cozy night in, this creative and delicious spread will add an extra dash of fun to your festivities! Enjoy and happy Halloween (and munching)!
PrintHalloween Snack Board
A colorful and tasty Halloween Snack Board filled with spooky treats that will delight your guests.
- Prep Time: 15 minutes
- Cook Time: 0 minutes
- Total Time: 15 minutes
- Yield: 8 servings
- Category: Snack
- Method: No-Cook
- Cuisine: American
- Diet: Vegetarian
Ingredients
- Fruits: seasonal apples, grapes, oranges
- Vegetables: bell peppers, carrots, cucumbers
- Cheese: cheddar, brie, pepper jack (or vegan alternatives)
- Crackers: whole grain, buttery, or gluten-free
- Candy: gummy worms, chocolate pumpkins, candy corn (or healthier alternatives)
- Dips: hummus, spooky guacamole
Instructions
- Gather your ingredients on the countertop for easy assembly.
- Select a large platter or wooden cutting board.
- Place your cheese selections first to create focal points.
- Add small bowls or clusters of fruits alongside the cheeses.
- Fill the spaces with crackers vertically or flat.
- Add Halloween-themed candy in clusters for fun.
- Finish with your dips in small bowls, adding a spooky touch.
- Step back and admire your creation before serving!
Notes
Embrace the chaos of creating your board! There’s no right or wrong way to do it.
Nutrition
- Serving Size: 1 serving
- Calories: 300
- Sugar: 20g
- Sodium: 200mg
- Fat: 15g
- Saturated Fat: 7g
- Unsaturated Fat: 6g
- Trans Fat: 0g
- Carbohydrates: 40g
- Fiber: 5g
- Protein: 10g
- Cholesterol: 25mg
Keywords: Halloween, snack board, party food, festive treats, vegetarian snacks