
How to Craft the Perfect Halloween Charcuterie Board: A Spooktacular Feast!
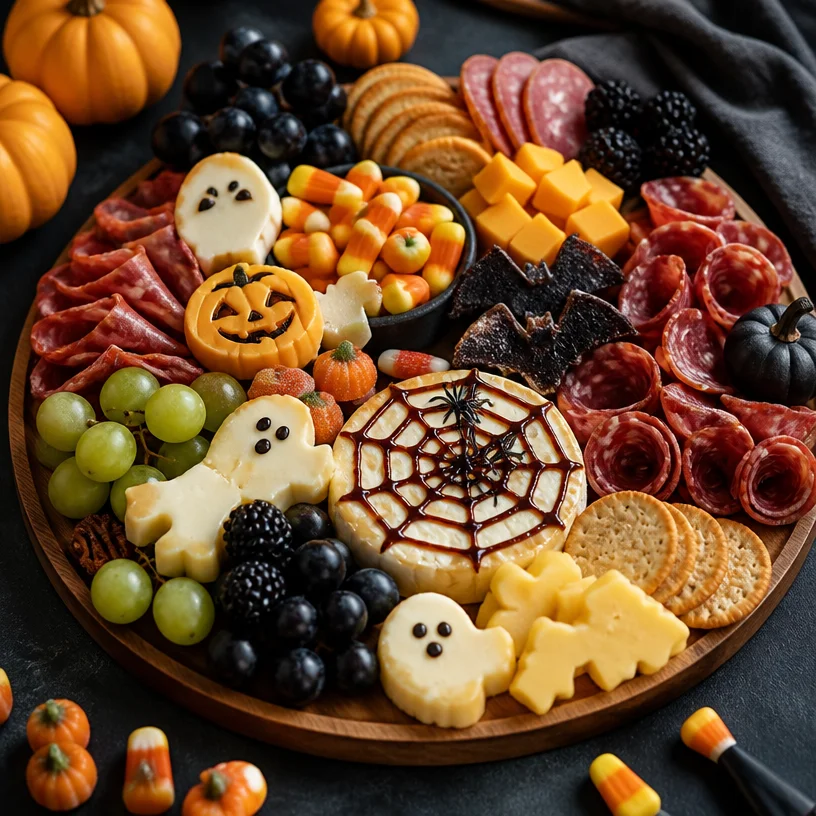
As the leaves start to crunch beneath our feet and the crisp autumn air begins to sweep through, we know that Halloween is just around the corner! It’s that magical time of year when pumpkins are carved, costumes are donned, and of course, everyone is on the lookout for festive food that will evoke oohs and aahs from guests. Enter the Halloween Charcuterie Board—a delightful platter that combines whimsy with gourmet flavors! This culinary concoction is not only a feast for the eyes but also a way to bring together your favorite cheeses, meats, fruits, and even some sweet treats—all with a spooky twist.
Imagine gathering your friends and family around an elegantly arranged spread of colorful ingredients; each bite is a delightful surprise! Plus, the best part about creating a charcuterie board is that it’s ridiculously easy and fun! You don’t need a Michelin star to whip one of these up—just a little creativity and the right ingredients. So grab your favorite platter, put on your favorite playlist, and let’s dive into how you can create a Halloween Charcuterie Board that will have everyone talking long after the last cobweb-covered cracker has disappeared!
A Spooky Slice of Memory
Growing up, Halloween was one of the most exciting times of year for my family. We would spend days preparing our costumes—transforming into everything from witches to superheroes. But what I looked forward to the most was the Halloween party at my best friend Elena’s house. She always outdid herself by planning the most amazing feast, complete with themed snacks that could easily rival a witch’s cauldron.
One of the highlights was her charcuterie board that she cleverly transformed into a spooky masterpiece! Ghoulish cheeses, eerie meats arranged like grave stones, and fresh fruits that looked like eyeballs were just a few of the enticing elements. I’ll never forget the moment we all gathered around, giggling at the elaborate display and devouring everything in sight—delighting in how fun and creative food could be. It sparked my obsession for creating charcuterie boards for special occasions, especially Halloween. Since then, I’ve picked up a few tricks and tips that I can’t wait to share with you!
Ingredients You’ll Need
Let’s gather our essentials! Here’s what you’ll need to create your Halloween-themed charcuterie board:
-
Assorted Cheeses
Think sharp cheddar, creamy brie, and herbed goat cheese. Choose varieties that vary in flavor and texture. Feel free to swap out any cheeses based on preference or availability! -
Cured Meats
Salami, chorizo, and pepperoni work wonderfully. For a vegetarian option, consider marinated artichokes or grilled veggies. -
Crackers and Breads
Choose a variety of textures! Think thin, crunchy crackers and soft, rustic bread slices. Gluten-free options are also easily found in stores. -
Seasonal Fruits
Grapes, figs, and sliced apples are classic choices, but you can also include visually fun fruits like blackberries or even edible flowers for a spooky touch. -
Candy
Skulls, gummy worms, or chocolate-covered pretzels—add whimsical treats that fit the theme to indulgently sweeten the deal.
Chef Insight:
For a captivating board, aim for a good balance of sweet, salty, and savory flavors. Contrast is key in creating a visually appealing and delicious charcuterie board!
Step-by-Step Instructions
Now that we’ve gathered our ingredients, it’s time to put it all together! Follow these steps to create an amazing Halloween Charcuterie Board:
-
Choose Your Board
Start by selecting a large wooden board or a decorative serving platter. The surface matters; a rustic board adds a great visual touch! -
Create a Base Layer
Begin with your larger items, like cheeses. Cut specific cheeses into fun Halloween shapes using cookie cutters! Space these evenly around the board. -
Add Your Meats
Arrange your cured meats in a way that draws the eye; try folding or rolling them for added texture. Form them into spooky shapes like skulls or tombstones! -
Fill in the Gaps with Crackers
Lay down a variety of crackers, filling in any gaps on the board. Stack some complementing the layout to create height and flow. -
Incorporate Fruits and Vegetables
Place your seasonal fruits strategically; think about balance in color and shape. Add some pops of color with edible flowers or sprigs of herbs for garnish. -
Sprinkle on the Sweets
Finally, add those whimsical cookie decorations and candy! Alternate between the savory and sweet items to create visual interest and maintain balance. -
Garnish and Shape
A sprinkle of fresh herbs or some berry sauce to drizzle can elevate the board, making it even more enticing!
Pro Tip:
Don’t be afraid to play with height, texture, and color on your board! The more layers you create, the more visually stunning it will be.
Serving Suggestions
For serving, place your charcuterie board at the center of the table, allowing your guests to help themselves. Accompany the board with small tongs, toothpicks, or cocktail picks to keep things hygienic and easy. You can also incorporate small serving dishes filled with dips or spreads to add flavor variety. Arrange everything so it invites interaction; the goal is for everyone to want to dive right in!
Recipe Variations
Here are a few fun twists to consider:
-
Themed Additions: Incorporate items like ghost-shaped cheese slices or pumpkins made from orange bell peppers.
-
Sweet and Savory Contrast: Add honey, preserves, or dark chocolate for those who enjoy sweet flavors paired with cheese.
-
Mini Charcuterie Cups: For a playful take, use small cups filled with individual servings of cheeses and meats, perfect for handing out at parties!
-
Vegan Board: Replace all animal products with plant-based substitutes—erve almond cheese, veggie sticks, or arranged fruits.
-
Gluten-free Focus: Keep it gluten-free by using rice crackers and veggie chips as your base for crunch.
Chef’s Notes
I feel that every Halloween is a chance to be creative—it’s like a culinary art project! Over the years, I’ve experimented with flavors and presentation styles. One year, I made a creepy crawly charcuterie board with chocolate spiders made from cookie dough and edible eyes, which went over well at a party. Bringing out the joy of creativity in the kitchen is what keeps me going!
Each charcuterie board evolves with what ingredients I have on hand and the mood I’m in. Now, I often invite friends to get involved, making it a fun communal activity that encourages laughter and creativity.
FAQs and Troubleshooting
1. How do I prevent my cheeses from getting melty?
To avoid melted cheese, keep your board in a cooler area and don’t let it sit out too long before serving! Also, bring your cheeses to room temperature just prior to serving for the best flavor.
2. What do I do with leftovers?
Leftovers can be repurposed for a variety of meals! Use leftover cheese in scrambled eggs or sandwiches, meats can be added to salads, and fruits can make a delightful dessert with a dollop of yogurt.
3. Can I make this ahead of time?
Absolutely! You can assemble most of your board a few hours before guests arrive. Just cover the board tightly with plastic wrap and place it in the fridge. Add any delicate ingredients like crackers right before serving.
4. What if someone has a nut allergy?
Always take into account any dietary restrictions. Substitute nuts with seeds, like pumpkin or sunflower seeds, for a crunchy alternative.
Nutritional Info
While specifics can vary depending on your selections, a well-rounded charcuterie board filled with fruits, cheese, meats, and good-quality crackers can offer protein, healthy fats, and a variety of vitamins.
Creating a Halloween Charcuterie Board should be a stress-free and enjoyable experience! Take the opportunity to unleash your creativity, and don’t hesitate to personalize this platter to make it uniquely yours. Whether it’s a family gathering, Halloween bash, or an intimate night in, this board will bring people together over good food—creating that warm, comforting atmosphere we all crave. Happy crafting, and remember: the spookier, the better!
PrintHalloween Charcuterie Board
Create a whimsical and delicious Halloween Charcuterie Board that brings together a variety of cheeses, cured meats, fruits, and spooky treats for your holiday celebration.
- Prep Time: 15 minutes
- Cook Time: 0 minutes
- Total Time: 15 minutes
- Yield: 8 servings
- Category: Appetizer
- Method: Assembling
- Cuisine: American
- Diet: Vegetarian
Ingredients
- Assorted Cheeses (sharp cheddar, creamy brie, herbed goat cheese)
- Cured Meats (salami, chorizo, pepperoni)
- Crackers and Breads (a variety of textures)
- Seasonal Fruits (grapes, figs, sliced apples, blackberries)
- Candy (skulls, gummy worms, chocolate-covered pretzels)
Instructions
- Choose Your Board: Select a large wooden board or decorative platter.
- Create a Base Layer: Begin with your larger items, like cheeses cut into Halloween shapes.
- Add Your Meats: Arrange cured meats, folding or rolling them for texture.
- Fill in the Gaps with Crackers: Lay down various crackers, stacking some for height.
- Incorporate Fruits and Vegetables: Place fruits strategically for color and shape balance.
- Sprinkle on the Sweets: Add whimsical cookie decorations and candy.
- Garnish and Shape: Elevate the board with fresh herbs or drizzle.
Notes
Play with height, texture, and color for a visually stunning board.
Nutrition
- Serving Size: 1 serving
- Calories: 450
- Sugar: 15g
- Sodium: 600mg
- Fat: 20g
- Saturated Fat: 9g
- Unsaturated Fat: 8g
- Trans Fat: 0g
- Carbohydrates: 50g
- Fiber: 5g
- Protein: 12g
- Cholesterol: 35mg
Keywords: Halloween, charcuterie, party food, festive snacks, holiday recipes