
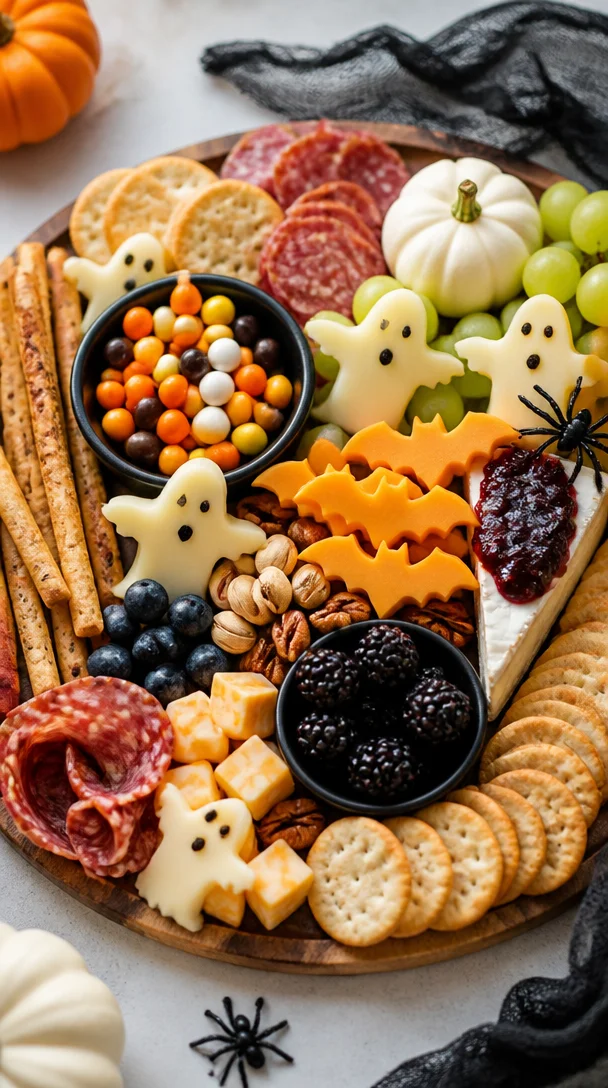
Unleashing Your Spooky Creativity: The Ultimate Halloween Charcuterie Board
Introduction
Welcome, fellow food enthusiasts! As the leaves turn and crisp air sweeps in, it’s time to embrace the charms of Halloween—a season bursting with creativity, festivity, and, of course, delicious food. Today, we’re diving into the whimsical world of Halloween charcuterie boards. If you’ve never created one before, fear not! It’s as delightful as it is easy, and I’ll be your guide to crafting a board that will impress your friends and family.
A Halloween charcuterie board is more than just a platter; it’s a canvas of flavors, textures, and a splash of spooky fun. Picture a beautifully arranged assortment of cheeses, cured meats, seasonal fruits, ghoulish sweets, and crunchy accompaniments. The best part? You can customize it to suit your personal taste and dietary needs, making it perfect for gatherings, parties, or even that quiet evening on the couch with a good movie.
As we embark on this culinary adventure, I’m excited to share a piece of my own kitchen lore that inspired my first Halloween gatherings. Grab your apron, and let’s get creative, channeling our inner ghosts and goblins!
Personal Story
Growing up, Halloween was always a big deal in my family. We had spooky decorations up for weeks, costumes meticulously crafted, and the kitchen became my mother’s sanctuary for all things sweet and savory. One year, I vividly remember transforming our dining room table into a spectral feast that rivals any haunted mansion.
Mom and I spent hours preparing everything from witch’s fingers (which were just hot dogs with slivered almonds) to chocolate-covered eyeballs (we used grapes—crafty, right?). As we assembled an array of snacks for trick-or-treaters, we stumbled upon the idea of a charcuterie board. Combining our favorite treats into one big platter seemed like the perfect way to celebrate.
The highlight of that evening was when, just as the doorbell rang, my dad dressed as a skeleton dropped a grape that rolled across the floor chased by my giggling little brother—what a scene! That memory encapsulates the spirit of Halloween: creativity, laughter, and the joy of coming together. Now, as I prepare a Halloween charcuterie board of my own, I can’t help but feel the energy of that festive atmosphere once again.
Ingredients
Creating the perfect Halloween charcuterie board requires a medley of ingredients. Here’s a list to get you started, with some tips along the way!
-
Cheese Selection:
- Brie: Soft and creamy, it’s perfect for spreading on crackers. Consider substituting with Camembert for a similar creamy texture.
- Cheddar: Go for a sharp cheddar for contrast, or use a double-decker variety for depth of flavor.
- Goat Cheese: Add a tangy kick; it’s so versatile! For a quicker fix, cream cheese can offer a smooth alternative.
-
Cured Meats:
- Salami: Spicy or mild, it’s a charcuterie staple. Prosciutto can add a delightful sweetness instead.
- Pepperoni: A Halloween favorite, but you can switch it out for chorizo if you want a smoky, spicy bite.
-
Crunchy Accompaniments:
- Crackers: A variety of shapes and flavors adds dimension. Look for spooky Halloween-themed crackers for added fun!
- Breadsticks: Think of these as “witches’ wands”—crispy and delightful! Pretzel sticks work too for a salty twist.
-
Fruits:
- Grapes: They also double as spooky eyeballs! Apples can be sliced and served, or consider seasonal pear slices.
- Seasonal Fruits: Clementines are great for a pop of color; simply peel them and leave the segments natural for a cheerful vibe.
-
Sweets:
- Candy Corn: A classic Halloween treat that adds color and nostalgia. Consider replacing it with gummy worms for a creepy twist.
- Chocolate-Covered Pretzels: Sweet and salty in one, these are perfect for snacking!
Step-by-Step Instructions
Now comes the fun part: assembling your Halloween charcuterie board! Here’s how to do it step by step.
-
Choose Your Base: Start with a large wooden board or a festive platter. The base is essential as it sets the stage. Consider a rustic look for that farmhouse vibe or sleek for a modern touch.
-
Arrange the Cheeses: Begin with your cheeses. Place the Brie and Goat cheese on opposite ends. This creates balance and encourages people to explore the flavors. Don’t worry about making it perfect—let it be organic and free-spirited!
-
Layer on the Meats: Next, roll your salami and pepperoni into fun shapes and place them around the cheeses. Alternate the types of meats for color contrast, stacking them in a way that sparks curiosity. Think of it like constructing a little meaty mountain!
-
Scatter Those Crackers: Use the crackers to fill in any gaps. You can stand them upright in jars for a playful look or lay them flat around the cheese. Be creative; let the crunch enhance the visual appeal!
-
Fruits for Brightness: Fill in the spaces with your seasonal fruits. Cluster the grapes together in a ghostly corner, or lay out clementine segments to encourage sharing. They introduce brightness and provide a burst of freshness.
-
Incorporate Sweets: Add bowls of candy corn and chocolate-covered pretzels towards the center. This will give your board a sweet focal point. Make sure to leave some room for those gummy worms to creep around the edges!
-
Finishing Touches: Sprinkle fresh herbs for a pop of green and maybe even add a few Halloween-themed decorations on the board itself. Look for miniature pumpkins or spooky figures to create that haunted vibe.
-
Create a Dramatic Presentation: When serving, don’t forget to arrange some funky toothpicks or even themed napkins for guests to easily grab their favorites without getting messy.
Serving Suggestions
Presenting your Halloween charcuterie board should be all about fun! Here’s how to make it an instant hit:
-
Gather Around: Place your board in a central spot where everyone can mingle. A cozy corner often encourages group snacking and light-hearted banter.
-
Theme Your Drinks: Pair the board with spooky-themed cocktails or seasonal beverages. Punch with floating fruit slices can win the day.
-
Encourage Taste Testing: Offer small plates for guests to build their own mini boards. It makes for a fun activity and lets everyone customize their snacking experience.
-
Use Creative Labels: Don’t hesitate to add little name tags for each ingredient using festive markers. “Witch’s Cheese”, “Goblin Grains” or “Mummy Meats” can provide some comic relief to the sophisticated spread.
Recipe Variations
Get adventurous with these creative twists on your Halloween charcuterie board:
-
Vegan Version: Substitute cheeses with nut-based cheeses and include an assortment of roasted vegetables like carrots and bell peppers. You could even use hummus or dips for a delicious alternative.
-
Sweet Tooth Board: Focus on sweets exclusively! Think of caramel popcorn, chocolate-covered fruits, and marzipan shapes. It’s a delightful treat for movie nights!
-
Spooky Cheese Shapes: Use cookie cutters for your cheeses to create bats, ghosts, and pumpkins—this adds a playful edge to the board.
-
Savory Breakfast Board: Imagine a brunch charcuterie board with smoked salmon, cream cheese, bagel bites, and assorted fruits. It brings a lovely morning vibe just in time for Halloween brunch gatherings!
-
Gourmet Touch: Include high-end cheese selections such as aged gouda or blue cheese, and add luxuries like truffle oil drizzled over crostini for a sophisticated spin.
Chef’s Notes
As you indulge in this classic Halloween culinary delight, remember every charcuterie board tells a story. Mine certainly has evolved over time; from simple cheese and meat platters in my childhood to grand displays rich with flavors and creative flair.
I recall one Halloween, I attempted to make colorful cheese spreads only to find out that the food dye turned into a mysterious shade that looked suspiciously like ogre goo—delightfully creepy, but not what I was aiming for! Nevertheless, it sparked conversations and laughter, illustrating that good humor paired with culinary adventures is the best ingredient of all.
FAQs and Troubleshooting
-
What if I run out of ingredients?
- No problem! Substitute similar flavors; replace cheeses with whatever you have on hand or add more fruits and sweets to fill the board.
-
How to keep fruits fresh?
- Consider citrus fruits as they naturally hold freshness longer. A squeeze of lemon or a light coating of citrus can help prevent browning.
-
What if the board looks empty?
- Don’t panic! Just rearrange the ingredients creatively to fill up gaps, or add seasonal items like pumpkins or decorative accents to create height.
-
How do I keep it gluten-free?
- Offer an assortment of gluten-free crackers and breadsticks. Additionally, focus on your fruits, cheeses, and meats for a gluten-free base.
Nutritional Info
Creating a charcuterie board offers an opportunity to indulge in a variety of flavors while being mindful of health. Here’s a general breakdown:
- Protein: Cured meats and cheeses provide a good source of protein; incorporating nuts can complement this further.
- Healthy Fats: Cheese and nuts are great sources of fats; opt for moderate portions to keep a balance.
- Fiber: Fruits and whole-grain crackers add fiber to help digestion.
- Vitamins: Seasonal fruits like clementines or grapes add vitamins, with a focus on antioxidants.
Final Thoughts
So there you have it—a whimsical journey into the delightful world of Halloween charcuterie boards! Beyond just a plateful of snacks, this festive creation embodies community, creativity, and an opportunity to share laughs over incredible flavors.
As the curtain closes on this spooky culinary escapade, remember to infuse every moment in the kitchen with joy, laughter, and a touch of magic. Whether it’s a gathering or a solo snack session, a well-crafted charcuterie board is sure to bring a smile. So, unleash your creativity, gather your loved ones, and have a hauntingly delicious Halloween culinary adventure!
PrintHalloween Charcuterie Board
A delightful and spooky Halloween charcuterie board filled with a medley of cheeses, cured meats, seasonal fruits, and sweets, perfect for festive gatherings.
- Prep Time: 15 minutes
- Cook Time: 0 minutes
- Total Time: 15 minutes
- Yield: 8 servings
- Category: Appetizer
- Method: Assembling
- Cuisine: American
- Diet: Vegetarian
Ingredients
- Brie cheese
- Sharp cheddar cheese
- Goat cheese
- Salami
- Pepperoni
- Crackers
- Breadsticks
- Grapes
- Clementines
- Candy corn
- Chocolate-covered pretzels
Instructions
- Choose your base: Start with a large wooden board or a festive platter.
- Arrange the cheeses: Place the Brie and Goat cheese on opposite ends.
- Layer on the meats: Roll your salami and pepperoni into fun shapes.
- Scatter those crackers: Use the crackers to fill in any gaps.
- Fruits for brightness: Fill in the spaces with your seasonal fruits.
- Incorporate sweets: Add bowls of candy corn and chocolate-covered pretzels.
- Finishing touches: Sprinkle fresh herbs and add Halloween-themed decorations.
- Create a dramatic presentation: Arrange funky toothpicks or themed napkins for guests.
Notes
Customize your board with personal favorite treats and serve with themed beverages.
Nutrition
- Serving Size: 1 serving
- Calories: 400
- Sugar: 20g
- Sodium: 600mg
- Fat: 25g
- Saturated Fat: 10g
- Unsaturated Fat: 12g
- Trans Fat: 0g
- Carbohydrates: 35g
- Fiber: 5g
- Protein: 15g
- Cholesterol: 50mg
Keywords: Halloween, charcuterie board, party food, festive snacks