
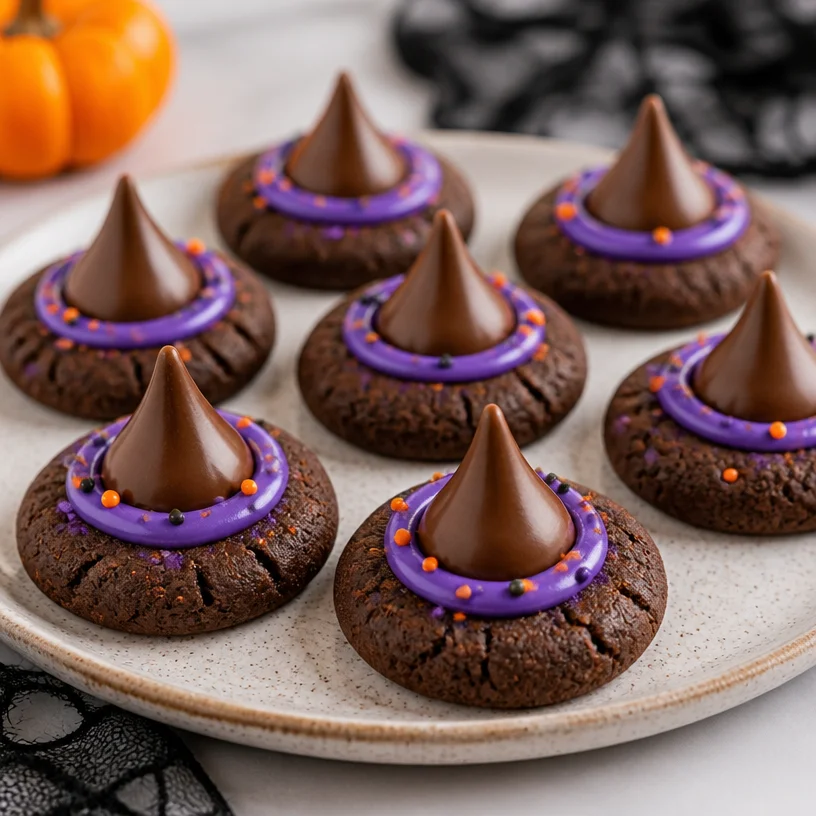
Witch Hat Cookies: A Spooktacular Treat!
Welcome, fellow foodies! As the leaves begin to change and the air turns crisp, there’s a certain magic in the kitchen that ignites the holiday spirit—especially when Halloween approaches. Today, I’m thrilled to share one of my all-time favorite treats: Witch Hat Cookies! These delightful bites are not just a feast for the taste buds but also a visual spectacle that adds a touch of whimsy to any Halloween festivities.
Imagine an afternoon filled with laughter, the scent of sweet cookies wafting through the house, and a gathering of family and friends, all vying for the cookie adorned like a mini witch’s hat. Trust me; these cookies are irresistibly cute, deliciously chocolaty, and downright fun to make! But beyond the recipe, there are stories and memories tied to them that make this treat even more special. So, let’s hop on our broomsticks and get ready to conjure some enchanting Witch Hat Cookies!
A Sweet Memory from the Past
I vividly remember the first time I made Witch Hat Cookies. It was during a Halloween party at my best friend’s house. I was in high school and, let’s just say, didn’t quite have a solid grasp on baking yet! However, my friend’s mom was a wizard in the kitchen, and she invited us to help her whip up these magical treats as one of our party snacks.
We rolled the cookie dough, melted the chocolate, and watched in awe as she expertly draped the chocolate kisses atop each cookie, crafting those distinctive witch hats with ease. I was completely smitten; I could hardly wait to taste them! The laughter we shared while decorating (and yes, sneaking bites here and there), made the whole experience memorable. Our Witch Hat Cookies were a hit, disappearing in a flash as our friends gobbled them up. From that day forward, I’ve always associated these cookies with fun, friendship, and the undeniable joy of cooking together.
Ingredients: Let’s Gather Our Spellbinding Supplies!
Before conjuring up these delightful treats, let’s gather the magical ingredients. Here’s what you’ll need:
- Sugar Cookies: The base of our witch hats! You can use store-bought or make your own from scratch. If you need a swift alternative, try a sugar cookie mix.
- Chocolate Kisses: The iconic “hat” that makes our cookies come to life. If you’re feeling adventurous, look for Halloween-themed varieties, like the special orange or purple ones!
- Chocolate Chips: For added decoration or melting, these little gems add another layer of sweetness. Semi-sweet or dark chocolate works best!
- Green Sprinkles (optional): These add a pinch of color and can mimic the “toxin” of the witch’s hat. You can substitute with any color sprinkles you fancy.
- Royal Icing or Edible Eyes (optional): For even more character! If you want to create different expressions or designs, this is where the fun begins.
Step-by-Step Instructions: Crafting Your Witch Hat Cookies
Now, let’s get to the good part—baking these unforgettable Witch Hat Cookies! Follow these steps, and let’s work together to create some magic.
-
Preheat Your Oven:
Begin by preheating your oven to 350°F (175°C). This step ensures an even bake, making sure those cookies turn out perfectly golden. -
Prepare the Cookie Dough:
If you’re using store-bought dough, skip this step! For homemade, cream together 1 cup unsalted butter, 1 cup granulated sugar, and 2 eggs until smooth and fluffy. Gradually mix in 3 cups flour, 1 tsp baking powder, and a pinch of salt until a soft dough forms.Chef’s Tip: For extra flavor, add a teaspoon of vanilla extract!
-
Roll and Cut the Cookies:
Roll portions of the dough into small balls—about a tablespoon each. Place them on a baking sheet lined with parchment paper, leaving space for spreading. You can lightly flatten each ball with your palm for a uniform bake. -
Bake:
Pop the cookies in your preheated oven for about 10-12 minutes, or until the edges are lightly golden. Keep an eye on them; you don’t want them overdone! -
Cool Down:
Once baked, remove the cookies from the oven and let them cool for a few minutes on the baking sheet before transferring to a wire rack to cool completely. -
Melt the Chocolate:
While you wait for those cookies to cool, melt your chocolate kisses in a microwave-safe bowl for about 30 seconds, stirring every 10 seconds until smooth.Chef’s Hack: You can also use a double boiler if you prefer!
-
Assemble the Witch Hats:
Take each cookie and dip the top into the melted chocolate, then immediately place a chocolate kiss in the center, pressing down gently so it adheres. -
Decorate:
While the chocolate is still warm, sprinkle with your green sprinkles or drizzle more melted chocolate for added flair. If you want to give it some personality, stick on edible eyes with a little melted chocolate. -
Let it Set:
Set the decorated cookies aside for the chocolate to harden before serving. If you’re short on time, pop them in the fridge for a quick cool-down!
Serving Suggestions: How to Present Your Cookies
Once your Witch Hat Cookies have set, it’s time to serve them! Here are some fun ideas:
- Arrange them on a festive platter or Halloween-themed table.
- Pair them with a spooky punch or hot cider for your guests.
- Use them as a fun centerpiece for your Halloween party table—trust me, they’ll be the star of the show!
Recipe Variations: Get Creative!
Now that you’ve mastered the classic Witch Hat Cookie, why not get adventurous? Here are a few fun variations to try:
- Peanut Butter Cups: Instead of chocolate kisses, use mini peanut butter cups for a delicious twist!
- Different Flavored Cookies: Swap your sugar cookie base for chocolate, pumpkin spice, or snickerdoodle cookies to mix things up.
- Colorful Sprinkles: Change up the color of your sprinkles for a fun, festive look. Think orange, purple, or even rainbow!
- Flavorful Frosting: Swap chocolate for a colorful royal icing and pipe on fun designs to further customize your witch hats.
- Gluten-Free Option: Use a gluten-free flour blend in place of regular flour, and you’ll have a gluten-free treat that everyone will adore!
Chef’s Notes: A Dash of Humor and Evolution
You know, as I reflect on these Witch Hat Cookies, I can’t help but chuckle at some of my early attempts. I remember once trying to get all fancy and added food coloring to my dough. Let’s just say, my cookies turned out…interesting. They resembled more of a witch’s potion than hats! But hey, every kitchen experiment teaches us something, right? Over the years, I’ve perfected my technique, and I love watching friends and family enjoy them as much as I did back then.
FAQs and Troubleshooting: Common Questions Answered
Q: Can I make the cookie dough ahead of time?
Absolutely! You can chill the dough for up to 3 days in the fridge or freeze it for up to a month. Just let it thaw before rolling!
Q: The chocolate isn’t sticking to the cookies. What do I do?
Make sure your cookies are still slightly warm when you attach the chocolate kisses. If they’re cool, the kisses won’t stick perfectly.
Q: How do I store Witch Hat Cookies?
Store your cookies in an airtight container at room temperature for up to a week. You may want to separate layers with parchment paper to avoid sticking!
Q: Can I bake these cookies without the kiss?
Why yes, you can! Just make simple sugar cookies, and they’ll still be delicious without the chocolate hats.
Nutritional Info
While the focus here is all about festive enjoyment, cookie calories can sneak up! Each Witch Hat Cookie (about 2 inches in diameter) contains approximately:
- Calories: 120
- Fat: 6g
- Carbohydrates: 16g
- Protein: 1g
Now that we’ve covered everything about Witch Hat Cookies, it’s time for you to get in the kitchen and create some of your own! These cookies are not just food; they’re delightful memories waiting to happen. So grab your apron and let the baking begin! You’re now part of the SavoryAddict crew, and trust me, these cookies are sure to delight. Happy Halloween baking!
PrintWitch Hat Cookies
Delightful Witch Hat Cookies are irresistibly cute, deliciously chocolaty, and perfect for Halloween festivities.
- Prep Time: 15 minutes
- Cook Time: 12 minutes
- Total Time: 27 minutes
- Yield: 24 cookies 1x
- Category: Dessert
- Method: Baking
- Cuisine: American
- Diet: Vegetarian
Ingredients
- 1 cup unsalted butter, softened
- 1 cup granulated sugar
- 2 eggs
- 3 cups all-purpose flour
- 1 tsp baking powder
- A pinch of salt
- Chocolate Kisses
- Chocolate chips (for decoration)
- Green sprinkles (optional)
- Royal icing or edible eyes (optional)
Instructions
- Preheat your oven to 350°F (175°C).
- Cream together the butter and sugar until smooth. Add eggs and mix well.
- Gradually mix in flour, baking powder, and salt until a soft dough forms.
- Roll dough into small balls and place on a lined baking sheet.
- Bake for 10-12 minutes or until edges are lightly golden.
- Remove from the oven and cool on a wire rack.
- Melt chocolate kisses in a microwave-safe bowl.
- Dip the top of each cookie into melted chocolate and immediately place a chocolate kiss in the center.
- Sprinkle with optional green sprinkles or drizzle more chocolate for decoration.
- Let the chocolate set before serving.
Notes
These cookies can be made ahead and stored in an airtight container for up to a week.
Nutrition
- Serving Size: 1 cookie
- Calories: 120
- Sugar: 8g
- Sodium: 100mg
- Fat: 6g
- Saturated Fat: 3g
- Unsaturated Fat: 2g
- Trans Fat: 0g
- Carbohydrates: 16g
- Fiber: 0g
- Protein: 1g
- Cholesterol: 30mg
Keywords: Halloween, cookies, dessert, Witch Hat Cookies, festive treats