The Ultimate Homemade Ice Cream Sandwich Recipe: A Summer Treat You’ll Adore
Ah, summer! The sun shines brightly, kids are playing outside, and nothing quite hits the spot like a delightful homemade ice cream sandwich. Picture this: two chewy, decadent chocolate cookies hugging a thick layer of your favorite creamy ice cream. It’s a treat that’s not just delicious but also brings back those cherished childhood memories of ice cream truck tunes and hot summer days. Today, I’m sharing my favorite recipe for homemade ice cream sandwiches that will transport you straight back to those carefree days (and trust me, you and your loved ones won’t be able to resist them).
The best part? Making these cookies is a breeze! You won’t need any fancy gadgets—just your trusty mixing bowl, a spoon, and a bit of love (okay, maybe a spatula, too!). The cookies themselves are rich and fudgy, perfectly balancing the creamy ice cream in between. And the customization options are endless! You can switch up flavors, add fun mix-ins, or even make them gluten-free if that’s your jam.
As we dive into this recipe, be prepared for a fun adventure in the kitchen. Let’s make some unforgettable memories and indulge our taste buds with the ultimate homemade ice cream sandwiches that will definitely keep you coming back for seconds (or thirds!). Grab your bib and get ready to dig in!
A Sweet Childhood Memory
Whenever I think of ice cream sandwiches, I can’t help but have flashbacks to my childhood summer vacations. My family would pack up the car and head to the beach for a week of sun, sandcastles, and, of course, ice cream. There was this charming little ice cream shop about a mile from our rental cottage, and the aroma of freshly baked cookies would waft through the air, luring my siblings and me in like moths to a flame. We would often order those classic ice cream sandwiches, with layers of chocolate cookies hugging creamy vanilla ice cream.
Those moments were filled with laughter as we sat on the pier, giggling and sharing our favorite flavors. Ice cream was not just a dessert for us; it was a symbol of weekend fun and family togetherness. I remember the challenge of not letting the melting ice cream drip down my arm, and the joy of sharing bites with my brother. Today’s recipe is a tribute to those blissful days, and I can’t wait for you to create your own memories with it.
Ingredients You’ll Need
-
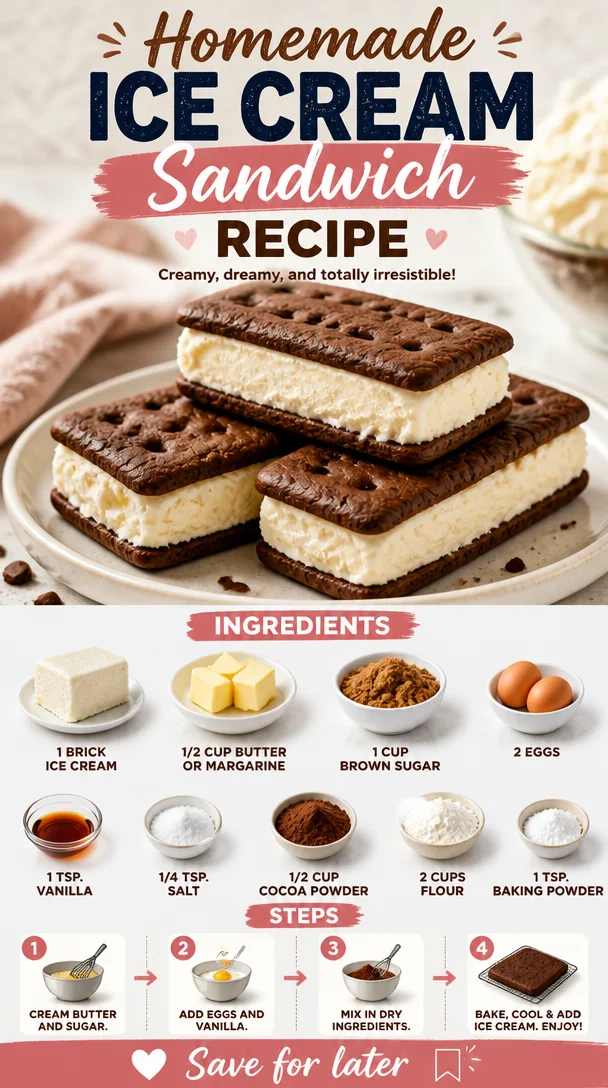
1 brick ice cream
The star of the show! Choose your favorite flavor—vanilla, chocolate, mint chocolate chip, or even something adventurous like salted caramel. If you’re feeling particularly inspired, make your own homemade ice cream for an extra touch. -
1/2 cup butter or margarine
Use unsalted butter for a controlled flavor! You can substitute margarine for a dairy-free option if needed. Coconut oil is another great alternative for a unique twist. -
1 cup brown sugar
This adds a rich, molasses flavor to the cookies. If you’re out of brown sugar, you could use granulated sugar instead, but the cookies will lose some of their delicious chewiness. -
2 eggs
Fresh eggs are essential for that perfect cookie texture. You can replace them with flax eggs (1 tablespoon ground flaxseed mixed with 2.5 tablespoons water per egg) for a vegan alternative. -
1 tsp. vanilla extract
Always opt for pure vanilla extract! It elevates the flavor profile profoundly. If you’re in a pinch, vanilla essence will work too. -
1/4 tsp. salt
A small pinch of salt balances the sweetness and enhances flavors! You might want to skip this if you are using salted butter. -
1/2 cup cocoa powder
This adds that rich chocolate flavor! Make sure to sift it to avoid lumps. You can also use Dutch-processed cocoa powder for a darker color and milder taste. -
2 cups all-purpose flour
Flour gives the cookies their structure. If gluten-free is your style, feel free to substitute with a gluten-free flour blend. -
1 tsp. baking powder
This little leavening agent helps the cookies rise while keeping them soft and chewy. Baking soda can be used as a substitute, but adjust the amount.
Step-by-Step Instructions
-
Preheat Your Oven
Start by preheating your oven to 350°F (180°C). This step is crucial as it ensures even baking, which leads to perfectly chewy cookies that hug your ice cream like a dream! -
Cream the Butter and Sugar
In a mixing bowl, combine the softened butter (or margarine) with the brown sugar. Using a hand mixer or a whisk, cream them together until light and fluffy (about 2-3 minutes). This is where the magic begins, my friends! The air trapped in the mixture will help create soft, chewy cookies. -
Incorporate the Eggs and Vanilla
Next, beat in the eggs, one at a time, followed by the vanilla extract. Make sure everything is well combined, so no egg streaks remain. Taste a little batter from the spatula—it’s a little indulgent, but I won’t tell anyone! -
Mix the Dry Ingredients
In a separate bowl, whisk together the cocoa powder, flour, salt, and baking powder. Gradually add the dry ingredients to the wet mixture, stirring until just combined. This is where you want to avoid over-mixing; we want softness, not toughness! -
Scoop the Dough
Using a cookie scoop or two spoons, portion out the dough and place it on a lined baking sheet, leaving space between each cookie since they’ll spread a bit while baking. Pro tip: Wet your hands slightly and roll the dough balls for that perfect round shape! -
Bake
Pop those bad boys in the oven and bake for 10-12 minutes. You’ll know they’re done when the edges are set but the center looks slightly underbaked. They may not seem ready, but they’ll firm up as they cool! -
Cool Them Down
Once out of the oven, allow the cookies to cool on the baking sheet for a few minutes before transferring them to a wire rack. This helps prevent them from breaking apart! -
Assemble the Sandwiches
Once your cookies are completely cooled, grab a scoop of that heavenly ice cream and place it between two cookies. Gently press them together until the ice cream reaches the edges. You can roll the sides in sprinkles or chocolate chips for extra flair!
Serving Suggestions
For plating, I recommend serving your ice cream sandwiches on a fun, vibrant plate for that Instagram-worthy photo! You can cut them in half to reveal the tempting ice cream filling spilling out, or present them whole with a drizzle of chocolate syrup on top. To make it even more delightful, add a small scoop of extra ice cream on the side. Trust me, your guests will be impressed!
Recipe Variations
Here are a few fun twists to customize your ice cream sandwiches:
-
Flavor Swaps: Try using different flavored ice creams like strawberry, coffee, or even pistachio for a unique taste sensation.
-
Cookie Flavors: Instead of chocolate cookies, use vanilla cookies or peanut butter cookies to change things up.
-
Mix-ins: Fold in chocolate chips, nuts, or crushed cookies into your cookie dough for added texture and flavor.
-
Healthier Options: Use whole wheat flour or a sugar substitute for a lighter take, or even add in oatmeal for a chewier concoction!
-
Vegan Creations: Substitute eggs and butter with flax eggs and coconut oil, plus use dairy-free ice cream for a delicious vegan option!
Chef’s Notes
This recipe has been a family favorite for years. I remember the first time I tried ice cream sandwiches, and I was determined to recreate that magic at home. Over time, I’ve played around with different flavors and freeze times. Did I mention once my friend tried to make them with double-stuffed Oreos? Let’s just say it turned out to be an ice cream catastrophe that still makes us chuckle!
Each batch varies slightly, depending on the flavor of ice cream used, which makes each creation special. Just remember to experiment and embrace the happy accidents—the best recipes sometimes come from playfulness in the kitchen!
FAQs and Troubleshooting
-
My Cookies Spread Too Much! What Did I Do Wrong?
If your cookies spread excessively during baking, it usually means the butter was too soft or melted when mixed. Try chilling the dough in the fridge for 30 minutes before baking to solidify the butter. -
Why Are My Cookies Hard?
Overmixing after adding the flour and baking them too long can lead to hard cookies. Mix the dough until just combined and keep an eye on them in the oven. -
Can I Freeze the Sandwiches?
Absolutely! Assemble your sandwiches and wrap them tightly in plastic wrap, then place them in the freezer. They’ll stay fresh for up to 2 weeks—perfect for a surprise treat! -
How Long Can I Keep Ice Cream Sandwiches in the Freezer?
Homemade ice cream sandwiches can last in the freezer for about 2 weeks if properly wrapped! But why wait? They’re best enjoyed fresh!
Nutritional Info
(Optional: You can calculate depending on specific ingredients used.)
Homemade ice cream sandwiches are a joyful indulgence, but moderation is key, especially if you’re keeping an eye on your sugar intake!
Now that you have all the info you need to create this delectable delight, I can’t wait to hear how your homemade ice cream sandwiches turn out! Share your creations and any twists you come up with, and let’s keep the kitchen fun rolling! Get ready to enjoy some summer lovin’—it’s ice cream o’clock!
PrintUltimate Homemade Ice Cream Sandwich

Delight in these homemade ice cream sandwiches featuring rich chocolate cookies and your favorite creamy ice cream, perfect for summer treats.
- Prep Time: 15 minutes
- Cook Time: 12 minutes
- Total Time: 30 minutes
- Yield: 12 servings 1x
- Category: Dessert
- Method: Baking
- Cuisine: American
- Diet: Vegetarian
Ingredients
- 1 brick ice cream
- 1/2 cup unsalted butter or margarine
- 1 cup brown sugar
- 2 large eggs
- 1 tsp. pure vanilla extract
- 1/4 tsp. salt
- 1/2 cup cocoa powder
- 2 cups all-purpose flour
- 1 tsp. baking powder
Instructions
- Preheat your oven to 350°F (180°C).
- Cream the butter and brown sugar together until light and fluffy.
- Incorporate the eggs one at a time and add the vanilla extract.
- Mix the dry ingredients in a separate bowl and combine with the wet mixture until just combined.
- Scoop the dough onto a lined baking sheet.
- Bake for 10-12 minutes until edges are set and centers are slightly underbaked.
- Cool on a wire rack before assembling.
- Assemble the sandwiches by placing ice cream between two cookies and pressing gently.
Notes
Feel free to customize the flavors of ice cream and cookies for endless delicious variations!
Nutrition
- Serving Size: 1 sandwich
- Calories: 300
- Sugar: 24g
- Sodium: 180mg
- Fat: 15g
- Saturated Fat: 8g
- Unsaturated Fat: 5g
- Trans Fat: 0g
- Carbohydrates: 40g
- Fiber: 2g
- Protein: 4g
- Cholesterol: 30mg
Keywords: ice cream sandwich, chocolate cookies, summer dessert, homemade ice cream, childhood memories