
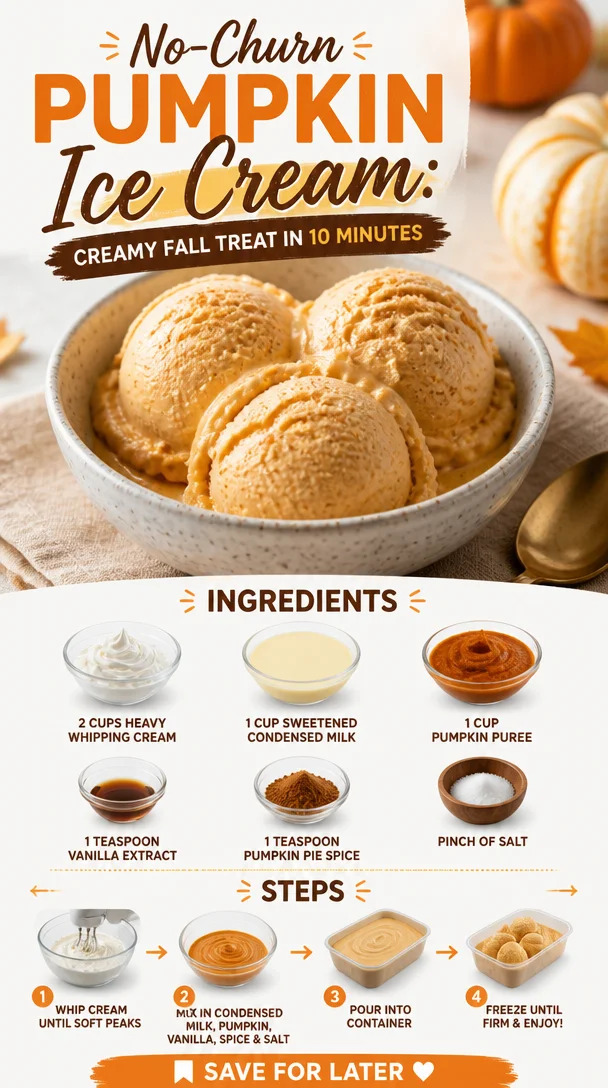
No-Churn Pumpkin Ice Cream: The Fall Treat You Didn’t Know You Needed
As the leaves start to turn and the crisp air settles in, there’s a certain magic that sweeps through the kitchen—it’s pumpkin season! There’s something undeniably comforting about the scent of pumpkin spice wafting through the air, evoking cozy memories of family gatherings, and festive celebrations. Speaking of celebrations, nothing wraps up a perfect fall day like a bowl of creamy, dreamy pumpkin ice cream. Yep, you read that right—ice cream! Even as the temperatures drop, I can’t resist this no-churn pumpkin ice cream. It’s the perfect treat to enjoy on a chilly evening, all while keeping that fall vibe alive.
And let me tell you, friends—this recipe is not just easy; it’s practically foolproof! With no ice cream maker needed and only a handful of simple ingredients, you’ll find yourself whipping up batch after batch to enjoy, share, or just keep all to yourself (no judgment here!). Today, I’m excited to walk you through this super fun recipe, share some kitchen tales, and give you tips to make this decadent delight totally your own!
So grab your mixing bowl and let’s dive into creating this crave-worthy frozen treat that will have everyone asking, “Is this really homemade?” It’s time to transform those pumpkins into a delicious dessert you won’t want to miss!
A Nostalgic Scoop of Fall
I often think back to my childhood, where every autumn Sunday was all about family, laughter, and the unmistakable fragrance of pumpkin filling the air. My parents had this tradition of going to the local pumpkin patch, and we’d spend hours picking the perfect gourds and sampling baked goods made from the season’s freshest produce. There’s one Sunday that stands out vividly—it was a chill in the air, and as we returned home, my mom whipped up a special treat: homemade pumpkin ice cream. The best part? No churn, just a grand mixing bowl and some well-used spatulas that we always battled over for the last few bites!
Once that bowl of creamy goodness hit the freezer, the anticipation was palpable. Waiting for it to set felt like an eternity, but the first scoop was pure bliss! It created fantastic memories that sparked my love for cooking and baking, and today, I’m merging those childhood memories with my passion for the kitchen. Let’s reclaim those nostalgic vibes and create our very own no-churn pumpkin ice cream together, shall we?
Ingredients
Here’s what you’ll need to gather to whip up your very own no-churn pumpkin ice cream:
-
2 cups heavy whipping cream
The backbone of our ice cream! Heavy cream creates that rich, silky smooth texture. If you want a lighter option, you could substitute with chilled coconut cream for a non-dairy alternative. -
1 cup sweetened condensed milk
This magical ingredient adds sweetness and creaminess. If you prefer to make a healthier version, you can try using a sugar-free or low-sugar version, though the taste may vary slightly. -
1 cup pumpkin puree
The star of the show! Make sure you use pure pumpkin puree, not pumpkin pie filling for the best flavor. Opt for homemade or canned—just check the label! If you’re feeling adventurous, you can use butternut squash puree as a fantastic substitute. -
1 teaspoon vanilla extract
Vanilla elevates the overall flavor profile, rounding everything out beautifully. If you prefer something unique, consider using maple extract instead for a delightful twist! -
1 teaspoon pumpkin pie spice
Pumpkin pie spice is essential for that classic fall flavor. If you don’t have any on hand, combine ½ teaspoon cinnamon, ¼ teaspoon nutmeg, ¼ teaspoon ginger, and a pinch of clove as a substitute. -
Pinch of salt
It may seem minor, but a tiny sprinkle of salt intensifies the sweetness and balances the flavors like magic!
Feel free to get creative with this list! The beauty of this recipe is that it’s adaptable to your taste preferences. Let’s make our ice cream dreams come true!
Step-by-Step Instructions
Now that we’ve got our ingredients prepped and ready, it’s time to roll up our sleeves and make some ice cream magic happen! Follow these steps closely, and I promise you will end up with a dreamy pumpkin ice cream that’ll have everyone raving.
Step 1: Whip the Heavy Cream
Start by chilling your mixing bowl and beaters in the freezer for about 10-15 minutes. This is a little trick to help the heavy cream whip up faster and achieve that perfect fluffy texture.
Once chilled, pour the heavy whipping cream into the bowl and whip it with an electric mixer on medium speed. Keep an eye on it—within a few minutes, you’ll see it soft peak! This means when you pull the beaters out, the cream will hold its shape but still be soft. We don’t want it too stiff yet; we’re adding more ingredients!
Step 2: Add the Sweetened Condensed Milk and Pumpkin
Now it’s time to fold in the sweetened condensed milk and pumpkin puree. Gently spoon in the sweetened condensed milk first, followed by the pumpkin puree. With a spatula, carefully fold these ingredients into the whipped cream using a figure-eight motion. The key here is to be gentle; we want to maintain that luscious airiness from the whipped cream.
As you’re folding, add the vanilla extract, pumpkin pie spice, and a pinch of salt. This is where the magic starts to happen! Keep folding until everything is smooth and well combined.
Step 3: Freeze and Set
Once you have a beautifully creamy mixture, it’s time to transfer this deliciousness into an airtight container. Smooth the top with a spatula and cover it tightly with a lid or plastic wrap.
Pop it into your freezer for at least 4-6 hours or, better yet, overnight! The longer, the better when it comes to this dreamy pumpkin ice cream. You want it to firm up nicely before enjoying.
Step 4: Scoop and Serve
When you’re ready to delve in, let the ice cream sit at room temperature for about 5-10 minutes before you attempt to scoop it out. This little wait makes a world of difference; it softens just enough for those perfect scoops without destroying your work of art.
Use an ice cream scoop or a large spoon and pile it high in your favorite dessert bowl. You can garnish it with crushed graham crackers, a sprinkle of cinnamon, or even a drizzle of caramel for that added flair!
Serving Suggestions
When it comes to serving this delightful pumpkin ice cream, the sky’s the limit! For an elegant touch, consider serving it in waffle bowls—who doesn’t love a good crunch? A pie crust crumb topping offers a fantastic contrast in texture. Or, try it topped with whipped cream and a sprinkle of cinnamon or nutmeg for that extra gourmet feel.
If you’re feeling festive, consider pairing it with a slice of warm apple pie or a gooey brownie for a sublime dessert experience. The combination of warm and cold is pure heaven!
Recipe Variations
Want to switch things up a bit? Here are a few fun variations to explore:
- Chai Spiced Pumpkin Ice Cream: Swap out the pumpkin pie spice for chai spice for a unique twist!
- Nutty Crunch: Fold in crushed pecans or walnuts right before freezing for a delightful textural contrast.
- Maple Swirl: Drizzle in some maple syrup right before tossing it into the freezer, giving you swirls of that delicious maple flavor.
- Chocolate Chip Pumpkin Ice Cream: Add mini chocolate chips for an irresistible treat that blends spicy and sweet!
- Vegan Alternative: Use coconut cream in place of heavy cream and maple syrup instead of sweetened condensed milk for a dairy-free delight.
The possibilities are endless, so go ahead and unleash your creativity!
Chef’s Notes
This no-churn pumpkin ice cream has come a long way since that unforgettable autumn day in my childhood kitchen. Over the years, I’ve played with flavors and textures, swapping ingredients and experimenting with new toppings. I’ll never forget the time I added a splash of bourbon to the mix (yes, I’m talking to you, adult version of me!) for a little something extra. It was a game changer!
The beauty of this recipe lies in its versatility. It’s adapted to seasons and occasions, filling my home with laughter and good vibes each time I make it. I always encourage readers to take a chance in their kitchens; after all, that’s where the best memories—ahem, and recipes—are born!
FAQs and Troubleshooting
1. Why is my ice cream too hard?
If your ice cream turns out rock solid after freezing, try reducing the freeze time to about 3-4 hours. Additionally, if you need to store it for longer, make sure to seal it tightly to avoid ice crystals forming.
2. Can I use low-fat cream?
While you can use low-fat cream, keep in mind that the texture and creaminess may be compromised. The higher fat content in heavy cream is what gives this ice cream its ultra-creamy texture.
3. How can I store leftovers?
To store any leftovers, use an airtight container and keep it in the freezer for up to a month. Remember to let it sit at room temperature for a bit before scooping!
4. What can I do if I don’t have any pumpkin puree?
No worries! Butternut squash puree works beautifully as a substitute, or you could make your own puree by roasting pumpkins, blending them, and straining out excess liquid.
Nutritional Info (Optional)
While the exact nutritional values can vary based on specific brands and ingredient choices, generally, one serving (approximately 1/2 cup) of this no-churn pumpkin ice cream contains around 300 calories, 16g fat, 40g carbohydrates, and 3g protein. It’s rich, satisfying, and a delightful indulgence!
There you have it! Your ticket to a delightful batch of no-churn pumpkin ice cream that embraces the crispiness of fall. With every spoonful, you’ll be transporting yourself to cozy kitchens filled with laughter and nostalgia. I can’t wait to see how your pumpkin ice cream turns out, so be sure to tag me in your delicious creations. Happy scooping! 🍦🎃
PrintNo-Churn Pumpkin Ice Cream
A creamy and dreamy no-churn pumpkin ice cream that captures the essence of fall with every bite.
- Prep Time: 15 minutes
- Cook Time: 0 minutes
- Total Time: 360 minutes
- Yield: 4 servings 1x
- Category: Dessert
- Method: No Churn
- Cuisine: American
- Diet: Vegetarian
Ingredients
- 2 cups heavy whipping cream
- 1 cup sweetened condensed milk
- 1 cup pumpkin puree
- 1 teaspoon vanilla extract
- 1 teaspoon pumpkin pie spice
- Pinch of salt
Instructions
- Chill the mixing bowl and beaters in the freezer for about 10-15 minutes.
- Pour the heavy whipping cream into the bowl and whip it until soft peaks form.
- Fold in the sweetened condensed milk, pumpkin puree, vanilla extract, pumpkin pie spice, and salt until smooth.
- Transfer the mixture into an airtight container and freeze for at least 4-6 hours or overnight.
- Let the ice cream sit at room temperature for 5-10 minutes before scooping and serving.
Notes
Feel free to add your favorite toppings like crushed graham crackers, whipped cream, or caramel for extra flair.
Nutrition
- Serving Size: 1/2 cup
- Calories: 300
- Sugar: 28g
- Sodium: 100mg
- Fat: 16g
- Saturated Fat: 10g
- Unsaturated Fat: 6g
- Trans Fat: 0g
- Carbohydrates: 40g
- Fiber: 1g
- Protein: 3g
- Cholesterol: 25mg
Keywords: pumpkin, ice cream, no-churn, fall dessert, easy dessert