The Sweet, Tangy Bliss of Homemade Plum Bars
Ah, plum bars! There’s something magical about biting into a perfectly baked bar that balances sweet and tart notes. If there’s one dessert that embodies the vibrant spirit of summer and the warm comfort of a cozy evening, it’s these glorious plum bars. Just imagine tasting a gooey, fruity filling nestled in a buttery, crumbly crust that melts in your mouth. Sounds dreamy, right?
I can still remember the first time I tasted a plum bar. It wasn’t just any ordinary afternoon; it was one of those gorgeous, sunny days where the light danced through the trees and made everything appear slightly more golden than it usually was. My grandmother had invited us over for a family gathering, and the kitchen was filled with laughter and the tantalizing aroma of baked goods. Among a spread of cookies and cakes, her famous plum bars caught my eye. I was instantly compelled to take a bite. The sweetness of the plums burst in my mouth against the tender crust, and I was hooked for life!
Fast forward to today, my love for plum bars has only grown, prompting me to whip up my own version that’s not just delicious but also celebrates the beautiful complexity of plums. Here’s your chance to join me in creating something extraordinary in your own kitchen. Together, we’ll dive into the art of making these scrumptious plum bars that are sure to impress friends and family (and yourself, of course!). So, roll up your sleeves and let’s bake!
A Trip Down Memory Lane
One vivid memory that springs to mind about plum bars is from a summer when I was a child, spent at my grandparents’ farm. Those long, lazy days were filled with berry picking and climbing trees, but nothing topped the excitement of harvesting ripe red plums alongside my cousins. We would dash toward the orchard, our laughter reverberating through the air as we raced to see who could fill their basket first.
Once back in the kitchen, plums would find their way into every dessert imaginable: crumbles, cobblers, and yes—plum bars. I can still hear my grandmother’s warm chuckles as she guided us through the recipe, her voice weaving stories about the origins of the fruit and the magic of baking. Those plum bars were not just a recipe; they were a symbol of togetherness, joy, and simple pleasures. The taste of those bars, bursting with goodness and nostalgia, inspired me to recreate that joyful experience and share it with you today.
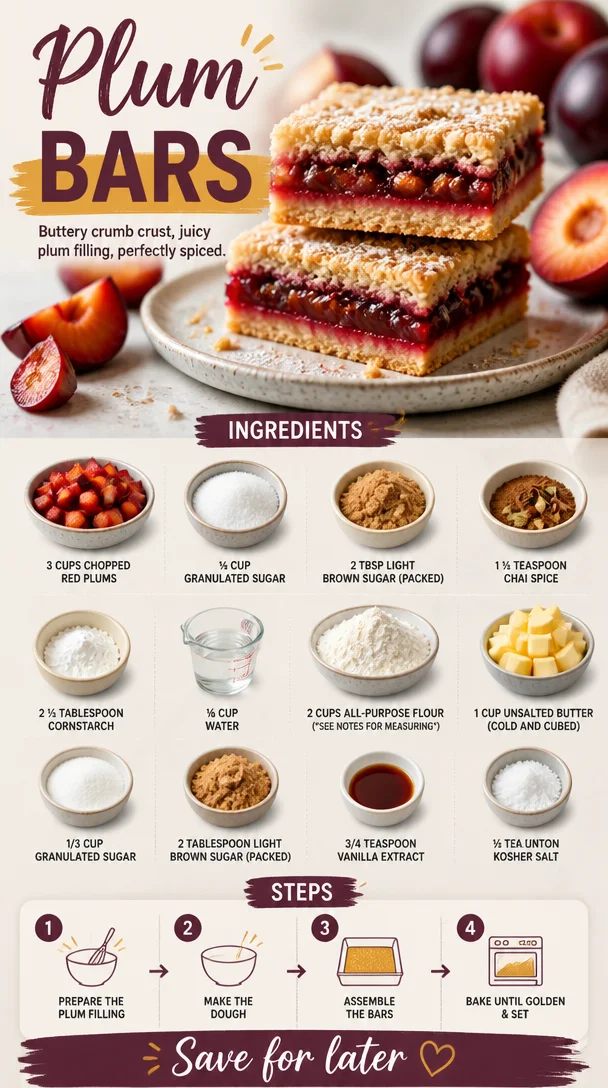
Ingredients You’ll Need
-
3 cups chopped red plums: The star ingredient! Make sure they’re ripe for maximum sweetness and flavor. If red plums aren’t your thing, yellow or purple plums work beautifully as substitutes, too!
-
¼ cup granulated sugar: This sweet touch helps balance the tartness of the plums. You can adjust this based on your sweetness preference!
-
2 tbsp light brown sugar (packed): This adds a delightful depth of flavor. If you don’t have brown sugar, you can use more granulated sugar or honey in a pinch.
-
1 ½ teaspoons chai spice: A delightful twist that adds warmth and character. Don’t have chai spice? A mix of cinnamon and nutmeg will work well!
-
2 ½ tablespoons cornstarch: This thickens the plum filling, keeping it from getting too runny. You could use arrowroot powder or tapioca flour as alternatives.
-
⅛ cup water: Just enough to assist in creating the filling without making it soupy.
-
2 cups all-purpose flour: Essential for the crust. For a gluten-free option, swap this with a gluten-free flour blend, but check if it requires any binding agents!
-
1 cup unsalted butter (cold and cubed): The key to that flaky crust—definitely don’t skip out on the chill factor! If you’re vegan, plant-based butter can be a great substitute.
-
⅓ cup granulated sugar: It’s necessary for that sweet crumbly crust. You can use coconut sugar for a healthier alternative.
-
2 tablespoons light brown sugar (packed): Just like the first, this enriches the crust’s flavor.
-
¾ teaspoon vanilla extract: This adds a warm, inviting aroma—never underestimate the power of vanilla! Feel free to skip it if you’re watching those flavor profiles but, let’s be honest, who would want to?
-
½ teaspoon kosher salt: A pinch of salt enhances the sweetness and balances everything out.
Step-by-Step Instructions
1. Prepare Your Plums
Begin by washing and chopping your plums into small pieces. You want about 3 cups, which is roughly 8–9 medium plums. Remember, the better the plums, the tastier your filling will be! After chopping, toss them in a bowl with granulated sugar, brown sugar, chai spice, cornstarch, and water. This mixture will create a luscious filling that’s perfect for our bars. Set aside to allow the flavors to meld together while we work on the crust!
2. Make the Crust
While your plums are marinating, let’s whip up that buttery crust. In a large mixing bowl, combine all-purpose flour, granulated sugar, brown sugar, and kosher salt. Stir these dry ingredients together until well blended.
Chef’s Tip: For optimal flakiness, work with cold butter! Using a pastry cutter or your fingers, incorporate the cold cubed butter into the flour mixture until it resembles coarse crumbs. You want some pea-sized butter pieces throughout for that buttery goodness.
3. Create the Crust Layers
Take about two-thirds of the mixture and press it firmly into the bottom of a greased 9×13-inch baking dish. This will act as our delicious base. Pop the dish into a preheated oven at 350°F (175°C) for about 15–20 minutes, or until lightly golden.
Tip: Make sure to keep an eye on that golden hue! If you overbake it, you might end up with a crumbly base instead of a tender crumb.
4. Assemble the Bars
Once your base is ready, take it out of the oven and let it cool for a few minutes while you prepare for the filling. Pour the plum mixture over the crust, spreading it evenly.
Now, take the remaining one-third of your crust mixture and sprinkle it evenly over the top of your plums. This will create that beautiful crumbly topping that everyone loves.
5. Bake to Perfection
Return the baking dish to the oven and bake for an additional 30–40 minutes. You’re looking for that perfect golden crust and for the filling to bubbly and start to caramelize slightly around the edges.
Pro Tip: If you notice the tops browning too quickly, cover the dish loosely with aluminum foil towards the end of baking!
6. Cool and Slice
Once out of the oven, let it cool completely. I know it can be tempting to dive right in, but trust me, allowing them to cool will help achieve those neat slices we all adore! After cooling, cut into squares and serve those beauties up.
Serving Suggestions
To plate your plum bars, simply grab a slotted spatula and carefully lift a square from the dish. Serve on a pretty plate and dust with powdered sugar if you’re feeling fancy. Fresh whipped cream or a scoop of vanilla ice cream on the side could elevate the whole experience! And don’t forget to share some with your loved ones—these bars are best enjoyed together!
Recipe Variations
-
Nutty Twist: Add ½ cup of finely chopped pecans or walnuts to the crust mixture for a nutty crunch.
-
Zesty Upgrade: While you’re at it, add a splash of lemon juice or zest to the plum filling for a refreshing zing.
-
Different Fruits: Don’t feel confined to plums! Substitute with ripe peaches or cherries for delightful seasonal twists.
-
Vegan Option: Swap the butter for coconut oil and use flaxseed meal mixed with water for an egg replacement if chosen.
-
Spice It Up: Kick it up a notch with some ground ginger or cardamom along with the chai spice for an extra aromatic layer.
Chef’s Notes
Baking is not only a science but an art too! Every time you make these plum bars, you can experiment with flavors and textures. I remember once when I accidentally used brown sugar that was too clumpy. The result? A caramel-like filling that blew everyone away at the family picnic! Just goes to show that mistakes can turn into the perfect kitchen miracle. Over the years, I’ve tweaked this recipe from my grandmother’s original, and it feels like I’m carrying her love into my kitchen.
FAQs and Troubleshooting
Q: My filling turned out too runny; what went wrong?
This may be due to not enough cornstarch or overripe plums. Ensure you measure your cornstarch accurately, and if the plums are overly ripe, the juices will be more abundant.
Q: Why did my crust come out too hard?
Overworking the dough or baking it for too long can lead to a tough crust. Aim for a light hand and check for that lovely golden color instead of relying solely on the timer.
Q: Can I make these ahead of time?
Absolutely! These bar beauties keep well in the fridge for about five days. You can also wrap them tightly and freeze for up to three months!
Q: How do I prevent the bottom from burning?
Consider using parchment paper as a liner for the baking pan. It’ll help with easy removal and avoid unwanted burnt edges.
By now, I hope you’re feeling inspired to give these plum bars a try! They’re more than just a recipe; they’re a culinary adventure inviting you to create delightful memories in your kitchen. So, gather your ingredients and time-travel to those sweet summer afternoons filled with laughter. Happy baking, my fellow savory addicts!
PrintHomemade Plum Bars
Sweet and tangy homemade plum bars with a buttery, crumbly crust and a gooey fruit filling.
- Prep Time: 15 minutes
- Cook Time: 50 minutes
- Total Time: 65 minutes
- Yield: 12 servings 1x
- Category: Dessert
- Method: Baking
- Cuisine: American
- Diet: Vegetarian
Ingredients
- 3 cups chopped red plums
- ¼ cup granulated sugar
- 2 tbsp light brown sugar (packed)
- 1 ½ teaspoons chai spice
- 2 ½ tablespoons cornstarch
- ⅛ cup water
- 2 cups all-purpose flour
- 1 cup unsalted butter (cold and cubed)
- ⅓ cup granulated sugar
- 2 tablespoons light brown sugar (packed)
- ¾ teaspoon vanilla extract
- ½ teaspoon kosher salt
Instructions
- Prepare Your Plums: Begin by washing and chopping your plums into small pieces. Toss them with granulated sugar, brown sugar, chai spice, cornstarch, and water. Set aside.
- Make the Crust: In a bowl, combine flour, granulated sugar, brown sugar, and salt. Incorporate the cold butter until it resembles coarse crumbs.
- Create the Crust Layers: Press two-thirds of the mixture into a greased baking dish. Bake at 350°F for 15–20 minutes until golden.
- Assemble the Bars: Pour the plum mixture over the crust and sprinkle remaining crust mixture on top.
- Bake to Perfection: Return to oven and bake for 30–40 minutes until golden and bubbly.
- Cool and Slice: Allow to cool completely before slicing into squares.
Notes
Dust with powdered sugar before serving. These bars keep well in the fridge for about five days; freeze for up to three months.
Nutrition
- Serving Size: 1 bar
- Calories: 250
- Sugar: 15g
- Sodium: 150mg
- Fat: 12g
- Saturated Fat: 7g
- Unsaturated Fat: 5g
- Trans Fat: 0g
- Carbohydrates: 35g
- Fiber: 2g
- Protein: 3g
- Cholesterol: 30mg
Keywords: plum bars, dessert, summer dessert, homemade, baking