4th of July Dessert Lasagna: The Ultimate Red, White, and Blue Layered Treat
Welcome, fellow foodies! It’s that exciting time of year again when we gather to celebrate the 4th of July with friends, family, fireworks, and—most importantly—delicious food! While we’re all about the savory dishes and juicy BBQ this time of year, let’s take a moment to dive into something that’s a total game-changer for your dessert table: 4th of July Dessert Lasagna! This dreamy, layered treat is a festive explosion of flavors and colors that will make your heart sing and your taste buds dance.
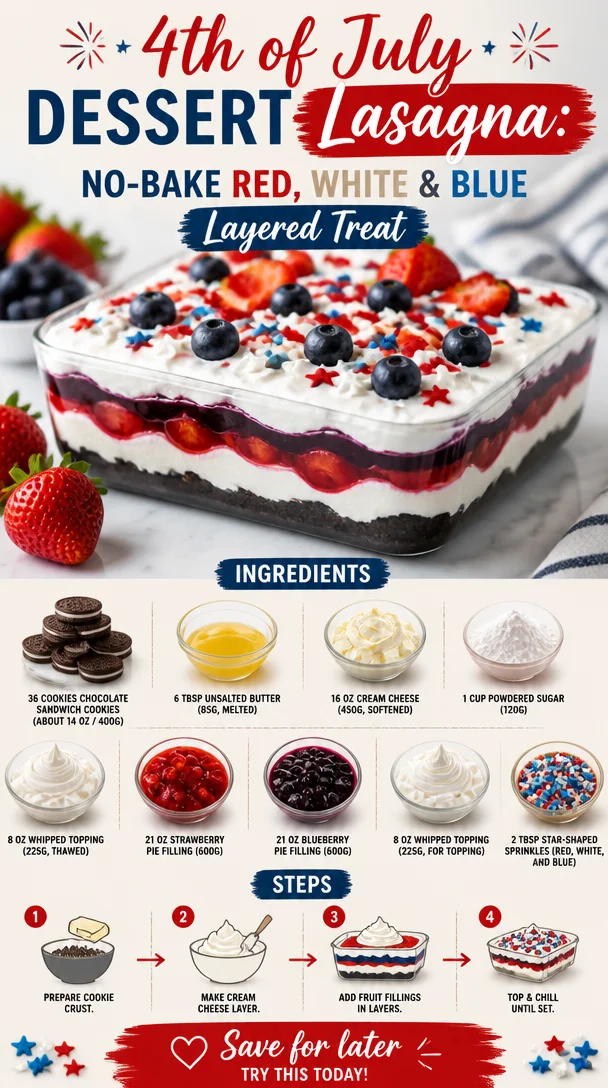
Picture this: layers of luscious cream cheese filling, sweet strawberry and blueberry pie filling, and a crunchy chocolate cookie crust all coming together to create the ultimate summer dessert. It’s a showstopper that is sure to impress—but don’t worry, it’s super simple to make. Who says you need to be a pastry chef to wow your guests? Grab your apron, and let’s get started on this dessert masterpiece that’s just as fun to make as it is to eat!
A Personal Story: Fireworks and Family
As I sit down to write about this fabulous dessert, I can’t help but recall a particularly memorable 4th of July from my childhood. My family had a tradition of gathering at my Uncle Mike’s backyard, where he’d set up a huge picnic spread and a dazzling fireworks display for us, the kids. Amid the laughter and excitement, I can still vividly remember my Aunt Linda’s dessert table, a bounty of sweets that felt like a rainbow on our plates.
That year, she unveiled a dessert lasagna that stole the show. Layers of fluffy creaminess, fruity bursts of flavor, and an unexpected crunch were enough to instantly win my heart. My cousins and I couldn’t get enough, and it became the pièce de résistance of our summer gatherings. Creating a dessert that sparks joy and brings people together is my ultimate goal, and this red, white, and blue creation does just that!
Ingredients You’ll Need
Here’s what you’ll need to make this decadent 4th of July Dessert Lasagna—and trust me, you won’t need to hunt down any obscure ingredients here!
-
36 Chocolate Sandwich Cookies (About 14 oz / 400g)
These form the crust and offer a great chocolate balance to the fruity filling. If you want a less sweet option, try using vanilla sandwich cookies instead! -
6 tbsp Unsalted Butter (85g, melted)
Butter ties the crust together, giving it a rich flavor. Can’t have dairy? You can use coconut oil as a substitute. -
16 oz Cream Cheese (450g, softened)
The heart of our creamy layer! Make sure it’s softened to get that smooth texture. If you need a dairy-free version, opt for vegan cream cheese. -
1 cup Powdered Sugar (120g)
This sweetener blends seamlessly into the cream and gives it that perfectly sweet taste without graininess. Did you know you can make your own by blending granulated sugar in a blender? -
8 oz Whipped Topping (225g, thawed)
For that light, airy texture in your cream layer. You can swap this out with homemade whipped cream if you’re feeling adventurous! -
21 oz Strawberry Pie Filling (600g)
This adds a beautiful red layer that’s oh-so-delicious. Feel free to use fresh strawberries with a little sugar if you prefer a fresher taste! -
21 oz Blueberry Pie Filling (600g)
A vibrant layer that complements the strawberries perfectly. If blueberries aren’t your jam, you could also use a mixed berry filling! -
8 oz Whipped Topping (225g, for topping)
We need a little extra fluff on top to finish things off. Same notes as above for swaps. -
2 tbsp Star-Shaped Sprinkles (Red, white, and blue)
These just add the final festive touch! If you can’t find star sprinkles, regular red and blue sprinkles will work just fine!
Step-by-Step Instructions
Now that we’ve gathered our ingredients, let’s roll up our sleeves and dive into making this layered beauty!
Step 1: Prepare the Crust
-
Crush the Cookies: Start by placing those chocolate sandwich cookies into a food processor and pulse until they’re fine crumbs. (No food processor? You can also put them in a ziplock bag and crush them with a rolling pin—great for stress relief!)
-
Mix with Butter: In a mixing bowl, combine the cookie crumbs with the melted butter and give it a good stir until it’s all moistened. You want it to resemble wet sand.
-
Set Up Your Dish: Press the cookie mixture into the bottom of a 9×13 inch baking dish evenly, making sure to pack it down tightly.
-
Chill: Pop the crust in the fridge for about 15-20 minutes to set up. This allows it to firm up and hold its shape, making the assembly easier later on.
Step 2: Prepare the Cream Layer
-
Blend Cream Cheese and Sugar: In a large mixing bowl, beat the softened cream cheese with the powdered sugar until it’s completely smooth and creamy. I recommend using an electric mixer for this step—it’s a game changer!
-
Fold in Whipped Topping: Now, gently fold in the thawed whipped topping until fully incorporated. Try not to deflate the whipped topping too much—this is what gives you that lovely creamy texture!
Step 3: Assemble the Dessert
-
Spread the Cream Layer: Take the chilled crust out of the fridge and evenly spread half of the cream mixture over it. Use a spatula to smooth it out.
-
Add Strawberry Filling: Spoon over the strawberry pie filling, spreading it evenly to create a vibrant red layer.
-
Add More Cream: Next, layer the other half of your cream cheese mixture on top of the strawberries, spreading it gently.
-
Top with Blueberry Filling: Finally, add the blueberry pie filling as your last layer. Now your dessert is looking so beautiful already!
Step 4: Chill and Serve
-
Chill Again: Cover the dish with plastic wrap and pop it in the fridge for at least 4 hours—or even overnight if you can wait! This helps all those delicious layers meld together.
-
Finish with Whipped Topping: When you’re ready to serve, add the last 8 oz of whipped topping on top. Spread it gracefully and give it some gentle peaks for that extra flair.
-
Sprinkle the Stars: Finish off your masterpiece by scattering the star-shaped sprinkles over the top. Ah, instant patriotism!
Serving Suggestions
When you’re ready to wow your crowd, slice this dessert into squares and serve it on festive plates. A drizzle of chocolate sauce on top adds an extra “oomph” for those hardcore chocolate lovers, while whipped cream on the side can’t hurt either. Don’t forget to make room for fireworks in the background!
Recipe Variations
-
Fruit Variations: Swap the strawberry and blueberry fillings for any fruit fillings you love! Raspberry and blackberry are great alternatives.
-
Mixed Berry Delight: Use a mixed berry pie filling for an extra burst of summer flavors and to keep it colorful.
-
Nutty Crust: For a twist on the crust, consider adding some crushed nuts like pecans or walnuts into your cookie mixture—if you’re not worried about making it gluten-free!
-
Chocolate Lovers’ Delight: Drizzle melted dark chocolate over each layer or make a layer of chocolate pudding—it’s a chocolate overload that’s oh-so-delicious!
Chef’s Notes
This dessert has evolved over time as I tried to perfect its layers and flavors. I remember the first time I attempted this recipe—it ended up being a stunning mess because I was too impatient to let it chill enough! Now, I’ve learned the importance of allowing each layer to set properly, and trust me, it’s worth the wait. My kitchen is frequently filled with laughter and the sweet aroma of whipped cream and fruit, making every batch a mini celebration!
FAQs and Troubleshooting
1. Why did my crust turn out too crumbly?
If your crust is too crumbly, it may be that you didn’t add enough melted butter. It should hold together when pressed. If there are leftovers, consider baking them for a few minutes to make cookie crumbs for another time!
2. Can I use fresh fruit instead of pie filling?
Absolutely! You can use fresh strawberries and blueberries. Just toss them in sugar to enhance their flavor and let them sit for a bit to release their juices.
3. What if I can’t find whipped topping?
No worries! You can whip your own heavy cream and stabilize it with a bit of cornstarch or gelatin to keep it fluffy. Just whisk until soft peaks form.
4. How long can I keep this in the fridge?
This dessert will stay delicious in the fridge for up to 3-4 days, but I guarantee it’ll be gone before you know it!
Nutritional Info (optional)
You can expect a delightful treat that brings a balance of sugar and sweetness. While I won’t dive deeply into the nutritional details, keep in mind that this dessert is meant for celebration!
Now you’re armed with everything you need to create a stunning 4th of July Dessert Lasagna that will have everyone asking for seconds! I can’t wait to hear how it turns out for you, so make sure to share your creations. Happy Independence Day—but most importantly, happy eating!
Print4th of July Dessert Lasagna

A festive layered dessert featuring cream cheese, strawberry and blueberry fillings, and a crunchy chocolate cookie crust—perfect for your 4th of July celebration!
- Prep Time: 20 minutes
- Cook Time: 0 minutes
- Total Time: 240 minutes
- Yield: 12 servings 1x
- Category: Dessert
- Method: Chilling
- Cuisine: American
- Diet: Vegetarian
Ingredients
- 36 Chocolate Sandwich Cookies (About 14 oz / 400g)
- 6 tbsp Unsalted Butter (85g, melted)
- 16 oz Cream Cheese (450g, softened)
- 1 cup Powdered Sugar (120g)
- 8 oz Whipped Topping (225g, thawed)
- 21 oz Strawberry Pie Filling (600g)
- 21 oz Blueberry Pie Filling (600g)
- 8 oz Whipped Topping (225g, for topping)
- 2 tbsp Star-Shaped Sprinkles (Red, white, and blue)
Instructions
- Prepare the Crust
- Crush the Cookies: Start by placing those chocolate sandwich cookies into a food processor and pulse until they’re fine crumbs.
- Mix with Butter: In a mixing bowl, combine the cookie crumbs with the melted butter and stir until moistened.
- Set Up Your Dish: Press the cookie mixture into the bottom of a 9×13 inch baking dish evenly.
- Chill: Pop the crust in the fridge for about 15-20 minutes to set up.
- Prepare the Cream Layer
- Blend Cream Cheese and Sugar: In a large mixing bowl, beat the softened cream cheese with the powdered sugar until smooth.
- Fold in Whipped Topping: Gently fold in the thawed whipped topping until fully incorporated.
- Assemble the Dessert
- Spread the Cream Layer: Spread half of the cream mixture over the crust.
- Add Strawberry Filling: Spoon over the strawberry pie filling evenly.
- Add More Cream: Layer the other half of your cream cheese mixture on top of the strawberries.
- Top with Blueberry Filling: Add the blueberry pie filling as your last layer.
- Chill and Serve
- Chill Again: Cover the dish with plastic wrap and pop it in the fridge for at least 4 hours or overnight.
- Finish with Whipped Topping: When ready to serve, add the last 8 oz of whipped topping on top.
- Sprinkle the Stars: Finish off by scattering the star-shaped sprinkles over the top.
Notes
This dessert can be made a day in advance for better flavor blending. Keep refrigerated for up to 3-4 days.
Nutrition
- Serving Size: 1 slice
- Calories: 350
- Sugar: 25g
- Sodium: 250mg
- Fat: 20g
- Saturated Fat: 10g
- Unsaturated Fat: 8g
- Trans Fat: 0g
- Carbohydrates: 40g
- Fiber: 1g
- Protein: 3g
- Cholesterol: 30mg
Keywords: 4th of July, dessert, lasagna, layered dessert, red white blue